Swaybar (changed) bushings and more

How-to's and repair secrets for your 4WD can be found here. Have a question? Ask it in here!
Post Reply
keith
Highest Ranking Member
Posts: 1249
Joined: Sat Sep 30, 2006 1:04 pm
Location: Tennessee

Swaybar (changed) bushings and more

Post by keith »

I just got some control arm bushings. While I was waiting for them to come in, I replaced the passenger side inner and outer tie rod ends.

Flash back to the beginning, son comes home and complains about a violent shaking in the front end. Being a little skeptical that he might be exaggerating a little, I take it out and sure enough, it feels like the wheel is falling off.

After replacing the tie rod ends, I pull the hubs to check the wheel bearings, good. Put it back together and noticed that there was still some play in the drivers side wheel. As I was wiggling the wheel, I finally spotted where the play was coming from. These are where the lower control arm mount bracket attachment is (was) spot welded to the outer side of the frame.

Image

Gonna take it to a friends body shop Monday and get it tack welded back in place. With lots of tacks that is.

My bad, I meant the swaybar to control arm bushings.
Last edited by keith on Wed Nov 21, 2007 4:37 am, edited 1 time in total.
User avatar
ARCHINSTL
Goldie Forever
Posts: 6369
Joined: Sat Apr 30, 2005 1:52 pm
My tercel:: Goldie is a 1986 SR5 attualmente con Weber/also owned the first T4WD in STL in late '82
Location: Kirkwood, a 'burb of St. Louis

Post by ARCHINSTL »

Wow!
It's lucky he did not encounter this on a washboard road at speed!
It does not look like rust - metal fatigue from a hard life - or just a life?
It might not be a bad idea to reinforce the other side as well while you are at it.
I'll check Goldie - she is a TN car as well...not that it is a TN-only condition...
I'm now going back under to finish the struts, et al.
Thanks for posting the alert.
Tom M.
T4WD augury?
"Oh, do not ask, 'What is it?' Let us go and make our visit."
T.S. Eliot - "The Love Song of J. Alfred Prufrock"
"Now and then we had a hope that, if we lived and were good, God would permit us to be pirates."
Mark Twain
keith
Highest Ranking Member
Posts: 1249
Joined: Sat Sep 30, 2006 1:04 pm
Location: Tennessee

Post by keith »

About two years ago, No 1 son slid the car into a curb at about 45 mph when someone ran a stop sign (very common in TN) Since then, hard driving and hard cornering eventually loosened things up a bit.

When this thing started wobbling, it made a washboard road feel like a newly paved freeway by comparison.
User avatar
Petros
Highest Ranking Member
Posts: 11941
Joined: Sun Jan 28, 2007 6:31 pm
My tercel:: '84 Tercel4wd w/extensive mods
Location: Arlington WA USA

Post by Petros »

I will have to check my real good too. I have had a persistent "clunk" when braking/accelerating that I have not found yet. All of the bushings and connections are fine, I have had the whole front suspention apart and found nothing wrong. I even started a thread some time ago looking for suggestions, to no avail. I have been suspecting it might be frame/body flexing just like this.
'87 Tercel 4wd SR5 (current engine swap project)
'84 Tercel 4wd (daily driver, with on going mods)
'92 Mazda MPV 4wd (wife's daily driver)
'85 Tercel 4wd DLX auto(daughter's daily driver)
'01 Honda Civic (other daughter's daily driver)
keith
Highest Ranking Member
Posts: 1249
Joined: Sat Sep 30, 2006 1:04 pm
Location: Tennessee

Post by keith »

Its worse than I thought. I didn't have my camera with me so I don't have pictures. I'll try to get some tomorrow, but there is major structural damage in this area.

There are cracks all over the place, and just under the box that the control arm attaches to the frame itself is cracked in half, the sides of the box are holding it together.

Gonna need a talented welder and I'm going to have to figure out how to make some doubler plates. Just when I thought I had this car almost like new again. I took it to a friends body shop this AM, but he was out of welding wire.

The good news is, the sway-bar is in good shape. The holes through the control arm appear to be a little elongated though. I also have gotten the lower control arm positioned right on the frame and pop riveted it in place for the welder.
User avatar
ARCHINSTL
Goldie Forever
Posts: 6369
Joined: Sat Apr 30, 2005 1:52 pm
My tercel:: Goldie is a 1986 SR5 attualmente con Weber/also owned the first T4WD in STL in late '82
Location: Kirkwood, a 'burb of St. Louis

Post by ARCHINSTL »

Wow !
I'm glad Goldie's life in Nashville was led in transporting kiddies!
Good Luck !
Tom M.
T4WD augury?
"Oh, do not ask, 'What is it?' Let us go and make our visit."
T.S. Eliot - "The Love Song of J. Alfred Prufrock"
"Now and then we had a hope that, if we lived and were good, God would permit us to be pirates."
Mark Twain
User avatar
splatterdog
Highest Ranking Member
Posts: 1624
Joined: Sun Mar 26, 2006 10:26 am
Location: Minnesota, USA

Post by splatterdog »

I'm amazed my 86 drove as well as it did when I got it. Lots of the control arm area was swiss cheese. viewtopic.php?t=2836 Couldn't really feel any difference after fixing it either. The sturdiness of these little cars is always surpsrising. Has the car been beat on? At least it doesn't look like you have to battle much rust.
keith
Highest Ranking Member
Posts: 1249
Joined: Sat Sep 30, 2006 1:04 pm
Location: Tennessee

Post by keith »

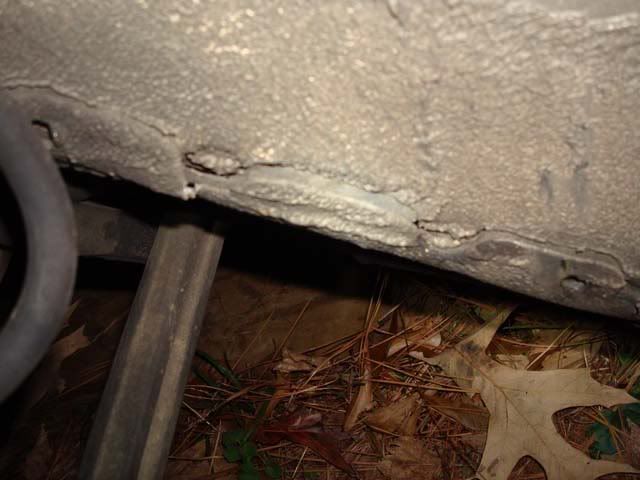
No rust, just metal fatigue. Got pics. I should have taken a wider angle view for more perspective.

Image
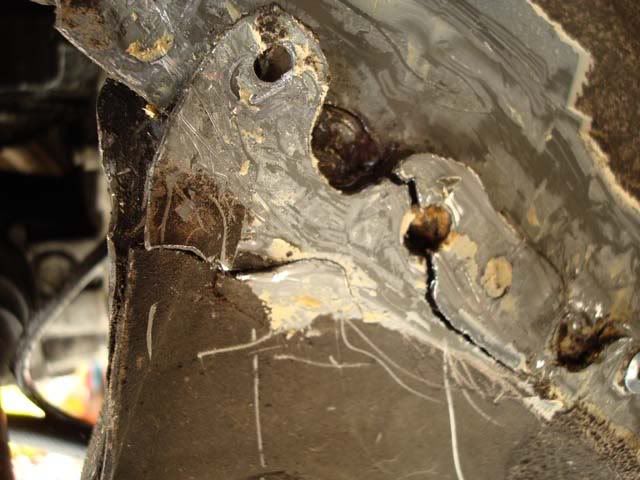
This is top or forward part of where the control arm box attaches to the frame.

Image
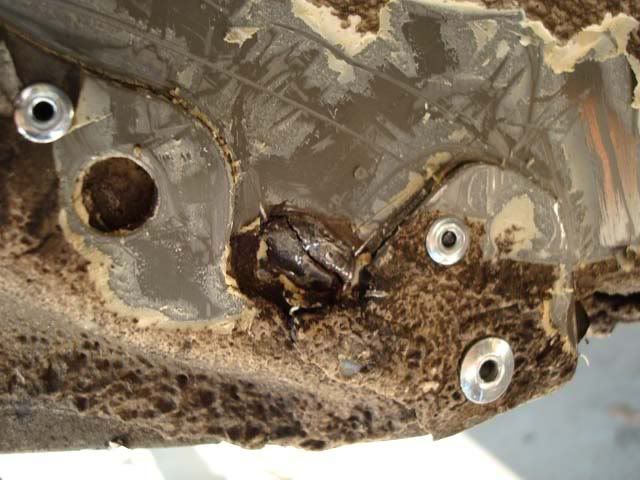
This is the box near the bottom. Note that it looks like it may have been welded here before. The weld is cracked. The cracked weld would have been done at the factory as it had the factory coating over it.

Image
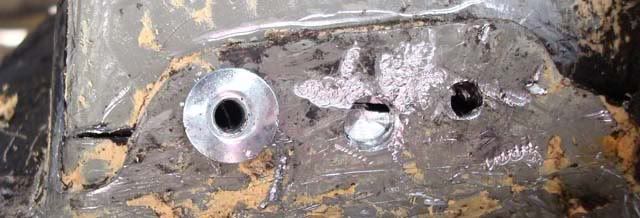
This is the front of the control arm box looking straight up. The frame is also cracked, you can see the crack through the hole I started to drill for a pop rivet. BTW the pop rivets are just to make it safe enough to drive to the shop.

Image
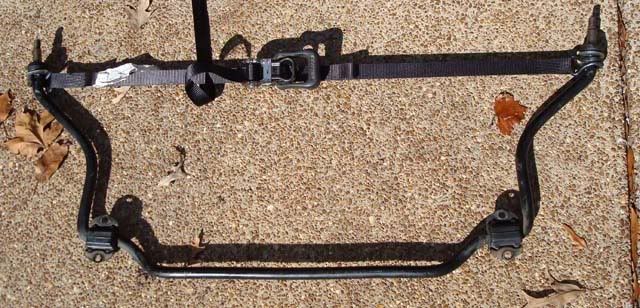
For those who have changed your sway bar bushings, is that sway bar supposed to be about 4" wider that the spacing of the holes in the control arms? I had to squeeze it in. How do you like this trick, used a cargo strap with a turn buckle. I balanced the bar on the floor jack while I put it in place and bolted it down.

My friend with the body shop ran out of welding wire. I went to a local small engine shop that does welding and he is willing to do it, but can't get to it till Thursday at the earliest, but I can't get back till Saturday. I talked to my friend tonight, he has the weld wire now and he tells me he's done a lot of repairs like this. Says he'll make a doubler plate as well.

I was going to make a doubler plate a t work from 10 ga but he tells me that this is too thick, has to be the same as the original metal which looks to be 16 or 18 ga. I think maybe he just can't cut or bend 10 ga, but I can. We have a 400 ton press brake at work. We have one larger but I've never operated that one.

Anyway, not sure which way to go, experienced or amateur where I have more control.
User avatar
Petros
Highest Ranking Member
Posts: 11941
Joined: Sun Jan 28, 2007 6:31 pm
My tercel:: '84 Tercel4wd w/extensive mods
Location: Arlington WA USA

Post by Petros »

Before you weld it, you should find the end of each crack and drill a small hole there. This is important to do before you weld it.

This is called "stop-drilling" and it will not allow the crack to propagate any further. Even with welding, the crack end is a huge stress riser. The crack will usually continue to propagate right through the new welds if you do not stop-drill the crack ends first. You can fill-in the holes with weld when he does the repair.

Also the welder needs the same thickness of metal because on metal so thin, by the time you get the thicker one hot enough to weld, you have already blown a hole right through the thinner part. When they are the same thickness they will heat up the same amount and can be welded. On thicker metal you can concentrate the heat more on the heaver part, but on thin sheet metal it is almost impossible to do even with a skilled welder.
'87 Tercel 4wd SR5 (current engine swap project)
'84 Tercel 4wd (daily driver, with on going mods)
'92 Mazda MPV 4wd (wife's daily driver)
'85 Tercel 4wd DLX auto(daughter's daily driver)
'01 Honda Civic (other daughter's daily driver)
User avatar
ARCHINSTL
Goldie Forever
Posts: 6369
Joined: Sat Apr 30, 2005 1:52 pm
My tercel:: Goldie is a 1986 SR5 attualmente con Weber/also owned the first T4WD in STL in late '82
Location: Kirkwood, a 'burb of St. Louis

Post by ARCHINSTL »

Again WOW!
Well, another trick I just discovered blown - I'm going to have to publish earlier.
I, too, used the cargo strap improvisation on the swaybar; the only difference is that I had the swaybar
inserted on one side and the two brackets mounted - your method may have been (relatively) easier.

Your difficulties should give some folks here pause for thought - wonder if those wild French members
have encountered anything like this?
Tom M.
T4WD augury?
"Oh, do not ask, 'What is it?' Let us go and make our visit."
T.S. Eliot - "The Love Song of J. Alfred Prufrock"
"Now and then we had a hope that, if we lived and were good, God would permit us to be pirates."
Mark Twain
takza
Highest Ranking Member
Posts: 4414
Joined: Fri Apr 02, 2004 4:28 am
Location: Tibetan plateau

Post by takza »

The two swaybars I dealt with ALMOST fit...the used one I put in was apparently tweaked a little in an accident, but I forced it to fit by hand and maybe using a jack.

As far as those bushings on the ends...they can be shimmed some using rubber sheet material washers...I also made a cylindrical steel shim to go over the threaded end to help snug that part up some. Just need to be sure they still have the ability to flex a lot...so you don't put too much stress on the threaded ends of the bar?
Give a boy a gun-give a biatch a cell phone-and pretty soon you almost got yourself a police state.

Orwell said: War is peace! Freedom is slavery. Ignorance is strength...

Image
keith
Highest Ranking Member
Posts: 1249
Joined: Sat Sep 30, 2006 1:04 pm
Location: Tennessee

Post by keith »

Petros wrote:Before you weld it, you should find the end of each crack and drill a small hole there. This is important to do before you weld it.

Also the welder needs the same thickness of metal because on metal so thin, by the time you get the thicker one hot enough to weld, you have already blown a hole right through the thinner part.
I did do the stop drilling, but some of the cracks have gone full circle already. As for the welding, I'm only going to have tack welds done, no seam welding. The tacks are actually stronger than seams when doing thin metal, so for this reason, the patch can be thicker.

I wish I could take the car to work and get one of our welders to do the job. We have some of the best welders around working there. They do weld rather think parts to sheet metal i.e. 1/2" thick hangers to 12 ga., without blowing holes through the tanks. The tanks have to be oil tight. I think I will do the doubler in 14 ga. though rather than 10.
Post Reply