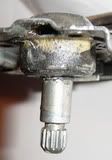
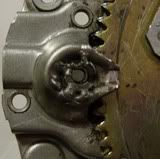
The mechanisim that rolls the front door windows up and down tends to bind up with age making it difficult to get the window up. If it is not lubricated the binding will bend the main arm making it even more difficult to operate. Forcing the crank handle will eventually cause the teeth on the gear plate to become stripped.
When that happens you may have a hard time finding a replacement part. They are getting scarce. If you do manage to locate one at a parts yard it will set you back about 45.00.
I decided to try making a new gear plate. I drilled out the two spot welds seperating the stripped out gear plate from the mechanism. I measured the plate and drew up a CAD part and took it to a guy who cut several out on his NC plasma cutting machine. A laser cutter would be even better.
We used 1/8 steel. I got 4 of them for twenty bucks.
I lined up the new plate holding it in place with vice grips and tack welded it to the mechanism. Then did a test crank to make sure it worked properly.
Ihad to tap it a few times with a hammer before it worked right then I added the finish welds.
The main arm was bent so i straightened it and lubed up all the moving parts and slides with light grease and oil.
I have a DXF Cad file I can email if anyone out there needs it.
front door window mechanisim repair
-
xirdneh
- Highest Ranking Member
- Posts: 2121
- Joined: Thu Aug 04, 2005 11:38 am
- My tercel:: 87 tercel 4x4 wagon w/reringed engine, 83 tercel 4x4 wagon w/salvaged engine and 4.1 Diff's
- Location: seabeck, washington, USA
front door window mechanisim repair
Love those Tercell 4x4 wagons but they sure suffer from road noise.

Rather than start a new post, I thought I'd just add to this one. I just fixed our driver side window regulator. The problem was a worn out crank bearing that caused the shaft to sit at an angle.

Here is the procedure starting with removing the door panel.
If you are doing this under a shade tree in the dirt or lawn, I suggest putting a large drip pan under the door, just in case you drop anything.
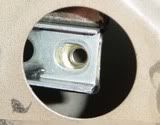
Start with lifting the trim piece between the window and interior panel. Raise it straight up using a thin screwdriver. Try to hook the clips so they stay with the trim piece. Then remove the three screws holding the panel in place. Remove the crank handle using the thin screwdriver to knock out the clip just behind the handle.
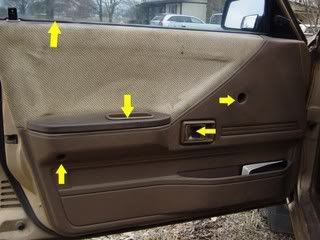
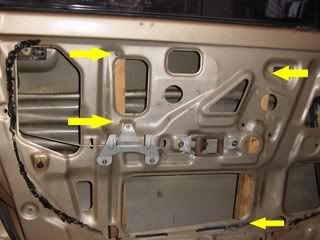
Then carefully go around the edge of the panel with the thin screwdriver and pry the door panel off. It is held by some snaps, 6-8 inches apart. With the panel removed, put the crank handle back on, without the clip, just to run the window all the way down. Then you can remove the 5 bolts holding the regulator in place and the two bolts holding the window to the regulator. The last two bolts are only accessible through the two holes at the bottom of the door. One of the regulator bolts runs under the door open rod, so if you can't find the 10mm wrench right away, then a metric Crescent wrench will do.
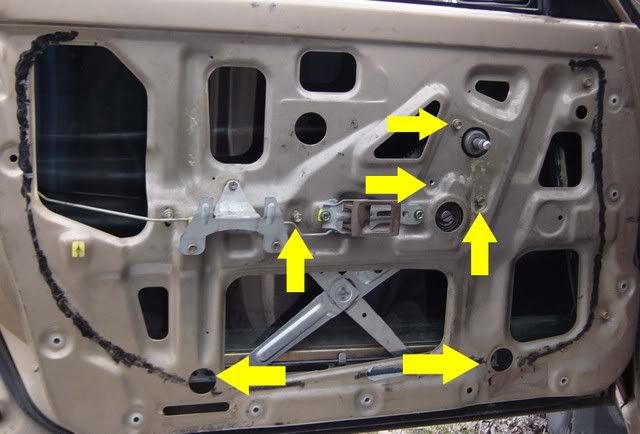
The picture showing the bolt locations is an assembly picture. While Toyota uses 5 bolts to hold the regulator in place, I have determined that only 4 are really needed, aforementioned shade tree.
Lift the glass up by hand and remove the regulator. If this repair is going to stretch over several days as mine did, then you can use a couple of 2x2's to hold the glass in place. It involves drilling a couple of holes and using some wood screws, but it will do for awhile.
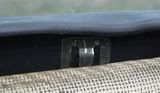
To repair the regulator, I used a dull chisel and a small punch to smooth the metal around the shaft.
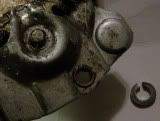
Then I fit a lock washer around the hole. I had the lock washer welded in place. This takes a very skilled welder as it is easy to burn holes through the thin metal. I recommend a TIG welder, but in this case, I know a very good welder who used a MIG.
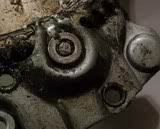
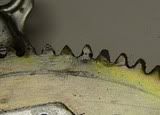
The tooth that is engaged when the window is up was worn down, so I had a guy TIG some metal to the tooth. I filed this into shape myself afterward.
Then I assembled the whole thing and it works, for now anyway. I do think that the crank gear has a bearing inside the housing that probably wore out, causing the shaft to get out of alignment. Removing the gear looked a bit difficult, but I think I could have done it if I tried. Welding the washer on just seemed simpler.
Here is the procedure starting with removing the door panel.
If you are doing this under a shade tree in the dirt or lawn, I suggest putting a large drip pan under the door, just in case you drop anything.
Start with lifting the trim piece between the window and interior panel. Raise it straight up using a thin screwdriver. Try to hook the clips so they stay with the trim piece. Then remove the three screws holding the panel in place. Remove the crank handle using the thin screwdriver to knock out the clip just behind the handle.
Then carefully go around the edge of the panel with the thin screwdriver and pry the door panel off. It is held by some snaps, 6-8 inches apart. With the panel removed, put the crank handle back on, without the clip, just to run the window all the way down. Then you can remove the 5 bolts holding the regulator in place and the two bolts holding the window to the regulator. The last two bolts are only accessible through the two holes at the bottom of the door. One of the regulator bolts runs under the door open rod, so if you can't find the 10mm wrench right away, then a metric Crescent wrench will do.
The picture showing the bolt locations is an assembly picture. While Toyota uses 5 bolts to hold the regulator in place, I have determined that only 4 are really needed, aforementioned shade tree.
Lift the glass up by hand and remove the regulator. If this repair is going to stretch over several days as mine did, then you can use a couple of 2x2's to hold the glass in place. It involves drilling a couple of holes and using some wood screws, but it will do for awhile.
To repair the regulator, I used a dull chisel and a small punch to smooth the metal around the shaft.
Then I fit a lock washer around the hole. I had the lock washer welded in place. This takes a very skilled welder as it is easy to burn holes through the thin metal. I recommend a TIG welder, but in this case, I know a very good welder who used a MIG.
The tooth that is engaged when the window is up was worn down, so I had a guy TIG some metal to the tooth. I filed this into shape myself afterward.
Then I assembled the whole thing and it works, for now anyway. I do think that the crank gear has a bearing inside the housing that probably wore out, causing the shaft to get out of alignment. Removing the gear looked a bit difficult, but I think I could have done it if I tried. Welding the washer on just seemed simpler.
Last edited by keith on Sun Jan 07, 2007 7:45 am, edited 1 time in total.
-
thebigbread
- Top Notch Member
- Posts: 212
- Joined: Fri Feb 10, 2006 7:35 pm
- Location: Citronelle, Al (north of mobile)
I was test driving my car around the block & rolled down the window, & BAM! but luckily all that happened was the arm had simply popped out.
1984 2wd wagon, "bottle rocket": http://www.myspace.com/1984tercel
1995 Isuzu TFR-S, "Shorty": no cardomain page yet
1995 Isuzu TFR-S, "Shorty": no cardomain page yet
-
JackWagon
- Advanced Member
- Posts: 65
- Joined: Tue Mar 31, 2015 10:48 am
- My tercel:: 1986 Toyota Tercel Wagon FWD
Re: front door window mechanisim repair
Does the window have to be lowered in order to get to the two bolts where the glass meets the rail of the regulator? Mine was taped up by the POs mechanic (been that way for years I guess).
-
Gottolovem

- Highest Ranking Member
- Posts: 1637
- Joined: Fri Jun 29, 2012 4:28 pm
- My tercel:: 1985 SR5 with snow plow,1987 auto 1984 parts car,1987 FX-16 GTS
- Location: Reno
Re: front door window mechanisim repair
Yes you can get at the two bolts with the window regulator rolled all the way down!
What do you mean by all taped up like plastic over the entire area the door panel is?
What do you mean by all taped up like plastic over the entire area the door panel is?
-
JackWagon
- Advanced Member
- Posts: 65
- Joined: Tue Mar 31, 2015 10:48 am
- My tercel:: 1986 Toyota Tercel Wagon FWD
Re: front door window mechanisim repair
Duct tape is holding the window up - in its closed position. The glass is taped to the door frame in a cross hatch because the regulator was broken in some way. I disassembled all but two bolts, I believe based on the image in this thread. Once I get the replacement regulator, It sounds like I need to figure out a way to lower the window enough to access the bolts, (via 2x2's?) retrieve the old one, and insert the new one. Is it easier to swap with the glass midway down or all the way down?
-
Gottolovem
- Highest Ranking Member
- Posts: 1637
- Joined: Fri Jun 29, 2012 4:28 pm
- My tercel:: 1985 SR5 with snow plow,1987 auto 1984 parts car,1987 FX-16 GTS
- Location: Reno
Re: front door window mechanisim repair
All the way down is best take your time it's all rather straight foward
-
Petros

- Highest Ranking Member
- Posts: 11934
- Joined: Sun Jan 28, 2007 6:31 pm
- My tercel:: '84 Tercel4wd w/extensive mods
- Location: Arlington WA USA
Re: front door window mechanisim repair
you can likely reach the two 10mm bolts without it all the way down, but it will be difficult to reach. Likely it can be done with an open end wrench, a light inside the door and peeking inside the various holes in the back of the door to see if you have the wrench on the bolts. If you already have a replacement you might as well cut the window free, if you have to repair your old one than you should just leave it if it is not too difficult to reach the two bolts at the lower edge of the window support. Or you can just tape it back up after you get the regulator out, should be easy to slide the window up with the door panel off.
Once your remove the regulator and get a replacement, you can untape the window to install the new one because you should be able to roll it up and down, so getting it back in should be easier.
remember to lubricate the window channels with silicone spray and the moving parts of the regular with lithium grease (others also work but this one will not attract dust).
good luck.
'87 Tercel 4wd SR5 (current engine swap project)
'84 Tercel 4wd (daily driver, with on going mods)
'92 Mazda MPV 4wd (wife's daily driver)
'85 Tercel 4wd DLX auto(daughter's daily driver)
'01 Honda Civic (other daughter's daily driver)
'84 Tercel 4wd (daily driver, with on going mods)
'92 Mazda MPV 4wd (wife's daily driver)
'85 Tercel 4wd DLX auto(daughter's daily driver)
'01 Honda Civic (other daughter's daily driver)
Re: front door window mechanisim repair
How do you take the window handle off? Pull it straight out? I was doing that and it didn't want to come off but I might not have been pulling hard enough (I didn't want to break it)
Thanks
S
Thanks
S
Driver: '86 4wd Tercel Wagon
Fun: '98 BMW M3 sedan
Now I have the best of both worlds!
Fun: '98 BMW M3 sedan
Now I have the best of both worlds!
-
Gottolovem
- Highest Ranking Member
- Posts: 1637
- Joined: Fri Jun 29, 2012 4:28 pm
- My tercel:: 1985 SR5 with snow plow,1987 auto 1984 parts car,1987 FX-16 GTS
- Location: Reno
Re: front door window mechanisim repair
Their is a c clip behind the handle get it with needle nose pliers or a pick. Can be done with a small rope too if you know how.
Youtube it
Youtube it
-
timothygodden
- Top Notch Member
- Posts: 163
- Joined: Mon Dec 31, 2012 12:45 am
- My tercel:: 84 tercel 4wd sr5 lifted, modified head, delta cam, 2" exhaust
- Location: seattle wa
Re: front door window mechanisim repair
Hem of your t-shirt or rag works well. Like this guy:
https://m.youtube.com/watch?v=3iLweWp72tU
I skip the screwdriver part.
I call it a Jesus clip cause that's what you end up saying when it goes flying away , lost one in the rain today actually.
https://m.youtube.com/watch?v=3iLweWp72tU
I skip the screwdriver part.
I call it a Jesus clip cause that's what you end up saying when it goes flying away
-
Petros
- Highest Ranking Member
- Posts: 11934
- Joined: Sun Jan 28, 2007 6:31 pm
- My tercel:: '84 Tercel4wd w/extensive mods
- Location: Arlington WA USA
Re: front door window mechanisim repair
there is actually very simple tricky tool to use, harbor freight sells a set for about $4 as i recall. the rag method works too, but you risk losing the clip.
'87 Tercel 4wd SR5 (current engine swap project)
'84 Tercel 4wd (daily driver, with on going mods)
'92 Mazda MPV 4wd (wife's daily driver)
'85 Tercel 4wd DLX auto(daughter's daily driver)
'01 Honda Civic (other daughter's daily driver)
'84 Tercel 4wd (daily driver, with on going mods)
'92 Mazda MPV 4wd (wife's daily driver)
'85 Tercel 4wd DLX auto(daughter's daily driver)
'01 Honda Civic (other daughter's daily driver)