The Toyota 3a head gasket is particularly prone to being damaged from even minor overheating events, you do not even have to get the temperature into the red zone on the temp gauge to damage the head gasket. Also if you have done any performance mods on this engine you chances of damaging the head gasket is even higher. The design of the 3a head does not allow coolant to fully circulate around the area near the exhaust valves, causing a localized area to get significantly hotter than the rest of the head. This will cause premature gasket failure, and why this engine is particularly heat sensitive, and the process for replacing the head gasket is also equally sensitive to proper procedure.
This is the procedure that I have developed for the 3ac engine over many head gaskets replacement jobs. I have incorporated very important modifications to improve gasket durability and to provide better cooling to the head. Also incorporated are procedures used by professional racing teams for installing head gaskets, as well as short cuts that I have found are effective at saving time without compromising the quality of the job. I have also including warnings about what to avoid to prevent damage to the engine and yourself.
To just replace the head gasket only should take 3 to 4 hours, depending how difficult it is to clean the parts, and presuming you do not experience any broken or frozen bolts. If you follow this procedure you will not even have to reset the ignition timing since the distributor stays in place. This saves both time and the need for a timing light. The FSM has you removing more parts than you need to just replace the head gasket, including removing the battery. This is not necessary, but it means you must take precautions not to damage parts or arc the batter terminals. DO NOT PLACE TOOLS on TOP OF THE BATTERY! If you can not help yourself than just remove it. But this adds more steps of course.
In my experience Toyota heads warped badly enough to need to be machine resurfaced are rare, this would only be required if it was badly overheated. Also, most repair shops will strip the head and have it checked for cracks, which I think is a waste of time and money on a Toyota head. I have never seen a cracked Toyota head, it may happen if the engine dropped a valve or has thrown a connecting rod and was bundled up, but even than it is very rare. Most repair shops will also replace a lot parts that are still serviceable and can be reused, and often talk the customer into replacing the timing belt and tensioner, the front seals, the water pump, all the gaskets and a lot of other parts which adds a lot of cost and time to the job. Unless these things need replacing anyway, there is no advantage to do all this extra work.
I will cover in this first installment the procedure for just replacing the head gasket. In later installments I will include more information on rebuilding the head.
Included in this procedure are ways to resurface the block and head in a home shop without heavy machinery.
Tools you will need:
Safety glasses
Drain Bucket
car jack and a Jack stand
10mm, 12mm, 14mm sockets and ratchet handle plus a breaker bar can be handy
14mm deep socket
16" minimum total length of various lengths of socket extensions
10mm, 12mm, 14mm and 19mm (3/4") combination open end and box end wrenches
Flat screw driver
long nose pliers
Torque wrench with 12 to 45 ft-lb (59 N-m) capacity
wide wood chisel or sharp heavy putty knife as a gasket scraper
12" long block of polished granite or smooth steel plate
Soft wire brush, 5/8" dia brush, scotch brite pads for cleaning
thread tool for cleaning out the head bolt theads (correct size tap or home made from a spare bolt)
Also nice to have, but not essential;
an air compressor and air nozzles
drop light or strong flash light
mechanics gloves
Supplies you will need:
A head gasket, Fel Pro or genuine Toyota (do not waste your time with any others)
new quality thermostat (if your existing one is new, it can be reused, but it is not worth the risk of damaging a new head gasket with a used or questionable t-stat. Do on waste money on cheap ones from communist factories, many are bad out of the box, Japan or USA made are best).
Possible you may need a new head pipe to exhaust manifold gasket (usually you can reuse this gasket if it is not damaged)
Possible you may need new O-rings for the by pass tube on the water pump housing (you usually can reuse these as well)
Wet and dry sand paper, 4 sheets 220 and 2 sheets 400 grit
Shop towels plus white paper towels
Carb cleaner spray
WD 40 or similar spray lubricant
Penetrating oil (ATF works excellent for freeing frozen nuts and bolts)
Light grease or specific thread lube for the head bolts
Gasket sealant
You will also need a place to work on the car, preferably on a paved surface and out of the weather (though I have done this job in the rain, in the snow and on gravel parking lots that were not even level, but I do not recommend it).
Procedure to Remove the Head
1. Remove the air filter assembly, two 10 mm bolts on the valve cover, and the center wing nuts.
2. Apply penetrating oil or ATF on the two 14 mm exhaust head pipe bolts to allow it soak.
3. Drain the radiator into a bucket or pan, save the coolant for reuse if you are not going to put in new antifreeze. You can proceed to the next steps while the coolant is still draining into the bucket.
4. Remove the fan belt from the alternator pulley by loosening the alternator, completely remove the upper alternator mount bolt and rotate the alternator (after you remove the belt) all the way to the right to get it out of the way. You can leave the upper mounting bracket in place.
5. Remove the water pump pulley, use the 10mm box end wrench on the pulley. You have to remove the pulley to get to the 10mm timing belt cover bolt behind the pulley, remove this bolt, and the other 10mm bolts on the timing belt cover.
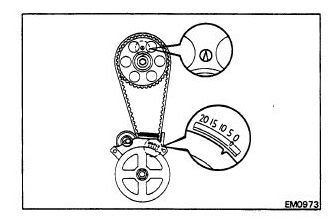
6. Loosen the 14mm bolt on the timing belt tensioner and back off the tension and snug the bolt back down. Slip the timing belt off the cam sprocket and let it flop down out of the way.
This is a good time to inspect the timing belt, if it is not cracked and not missing teeth or chunks of rubber, it is probably okay to reuse it (I have seen cars still running with half the teeth missing off the timing belts!). If you are going to replace the belt anyway you can do it at the same time you replace the head gasket, it will add about an hour or more of time. You will have to remove the radiator (to give you room to work), the front bolt and pulley (sometimes requires a puller), and the lower timing belt cover. It would not be a bad idea to replace the front main seal while you are at it. You will want to get the front pulley off before you remove the head since you will need to fill the number one combustion chamber (through the spark plug hole) with a soft cord to prevent the engine from turning to get off the large front bolt.
7. Remove the fuel lines from the fuel pump, remove the upper radiator hose, remove the vacuum lines that go from the right fender emissions control equipment and the fuel system, and the lines from the charcoal canister (you may want to number or label these to speed reassembly). Remove the heater hose coming from the back of the head. If any of these hoses or lines are bad or questionable, it is best to replace them now since you have them off. Unplug the electrical connectors from the temp sender on the outlet and front of the head, stow the wires out of the way on the right side of the engine. Unplug the two electrical connectors from the carb and the one from the distributor.
Note: You do not need to remove the spark plugs or spark plug wires, nor do you need to remove the distributor. However leaving the distributor installed on the head means it is vulnerable to damage while you are handling the head when it is off the engine, so you must use caution when handling the assembled head. If in doubt it only takes removing a 12 mm bolt, and two vac lines, to remove the distributor. But if you remove it, you will have to reset the rotor alignment of the distributor and also reset the ignition timing, adding a lot of extra work to get the car running.
8. Jack up the right side of the car and place a jack stand under it. I always test the safety of the car by pushing hard on it, and shake the car back and fourth, to make sure it is safe on the stand. Slide under the car with the breaker bar, the socket extensions and the 14mm deep socket and back off the exhaust bolts holding the head pipe to the exhaust manifold. It is important to use a quality socket and make sure the socket is fully engaged on the nut. These nutss are soft and are easily stripped of the hex. Removing these exhaust nuts are the most likely cause of any trouble you may encounter on this job. To make sure you get the nuts off it might be worth grinding the champher or lead-in taper off the end of the socket. This champher is intended to make it easier to get the socket over a nut or bolt, but it means you have less hex engagement. So it is better to grind off the tapered end of the socket to get more grip on the exhaust nuts. This usually get them off, but if these nuts are already messed up or really stuck, you may have to go to more drastic means. You can get better access to them by removing charcoal canister assembly (two 10mm bolts and several connectors and hoses). Sometime you can get it loose by heating it with a propane torch. With the extra access, after removing the canister, I have been able to get a sharp chisel on the nut and broke it loose by hammering it at a tangent in the direction to remove the nut. You can also try getting a file on it to put new flats on the nut, or even grinding it off if necessary.
9. There is a bracket that comes from under the exhaust manifold and bolts to the side of the block. There is a single 12mm bolt in this bracket end that is aft of the thermostat housing on the side of the block. Remove the bolt from the side of the block and you can leave the bracket attached to the manifold. It is difficult to see this bolt, but it is not too difficult to get a socket with an extension over it. If the head or manifold has been off the engine before there is a good chance there is no bolt in this bracket since it is easy to forget to install it. If you do not remove this you will be pulling and pulling on the head and you will not be able to break it free even thought all the other bolts are removed.
10. Remove the throttle cable from the carb and bracket (12mm open end wrench required), tuck it out of the way on the driver's side of the engine compartment. Remove the head ground strap off the back of the head. Remove the large vacuum hose that goes to the brake booster. Remove valve cover, three 12mm nuts. Double check all the wires and hoses are removed between the head assembly the block and chassis. The plastic TVSV at the coolant out let is easy to damage, it does not need to be removed but I recommend removing it. If you leave it in place always remember it is there when you have the head off and need move it around or flip it over. I have damaged these costly valves on my own car, so I always remove it, a 19mm open end wrench, or 3/4", removes it.
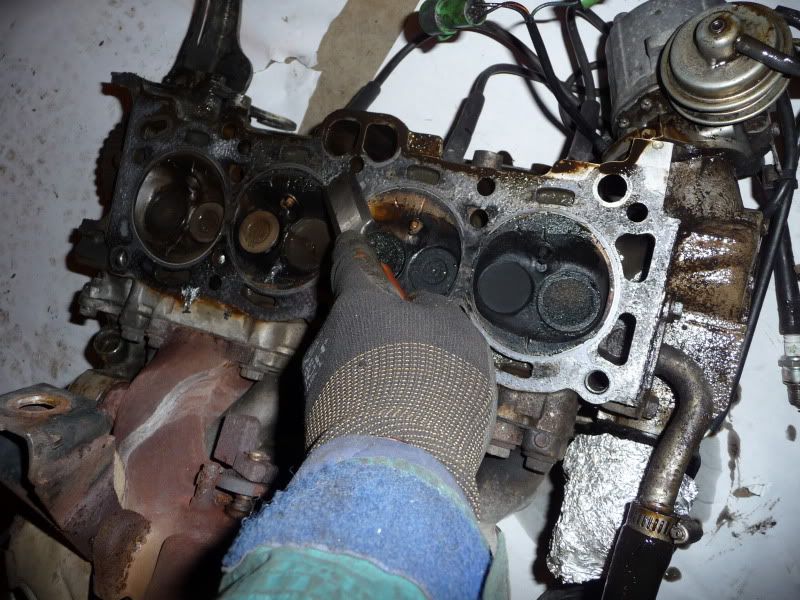
11. I like to suck up the pooled motor oil with a hand pump, from around the cam shaft, and put it down the two drain back holes. This is not necessary, but all the oil meant to lubricate the cam lobes gets messy when you pull the head off. Now you are ready to remove the 10 head bolts. Use a 12mm socket and extension, just break loose each of the head bolts in the reverse order of the torque sequence for installing the head. Than loosen all the bolts in the same order, this prevents possible warp. Remove all the bolts and get the heavy steel washer from under the bolt heads, you may need the long nose pliers or a magnate to get them all. One time the head bolts were full of corrosion and were very difficult to get out, this is pretty rare but if this happens there is not a lot you can do but force the head bolts all the way out with the breaker bar. This might be caused by not having the head grounded to the chassis separately from the block.
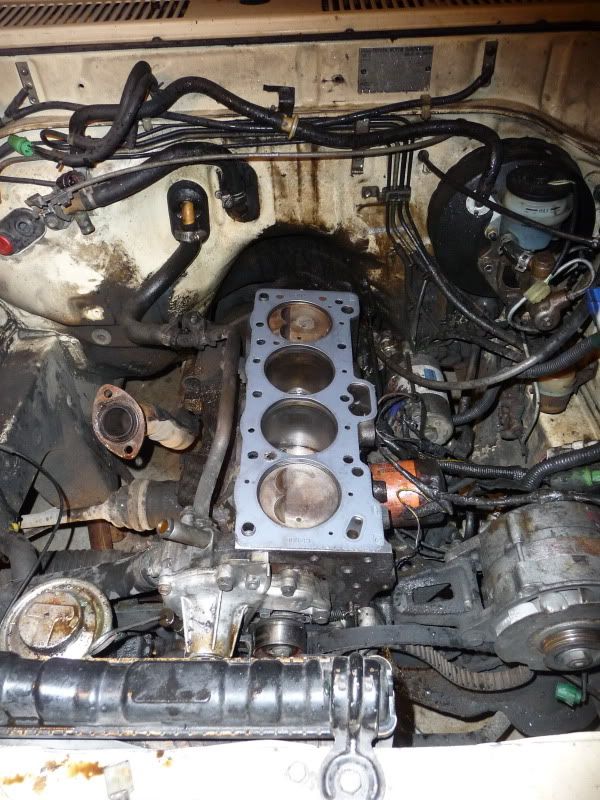
12. Now the head, complete with the carb, intake and exhaust manifold, distributor, and all the vacuum lines, should be able to come off as an assembly. You will have to break loose the head with a larger screw driver or a pry bar. Be careful not to damage the aluminum head face with the pry bar. You can lever edge of the head face or on the upper alternator bracket. Once broken loose lift it up and out, it is helpful to have an assistant help you lift it out of the car since the complete assembly is heavy and awkward to lift, but I have done it alone most of the time. Motor oil and coolant will spill out all over.
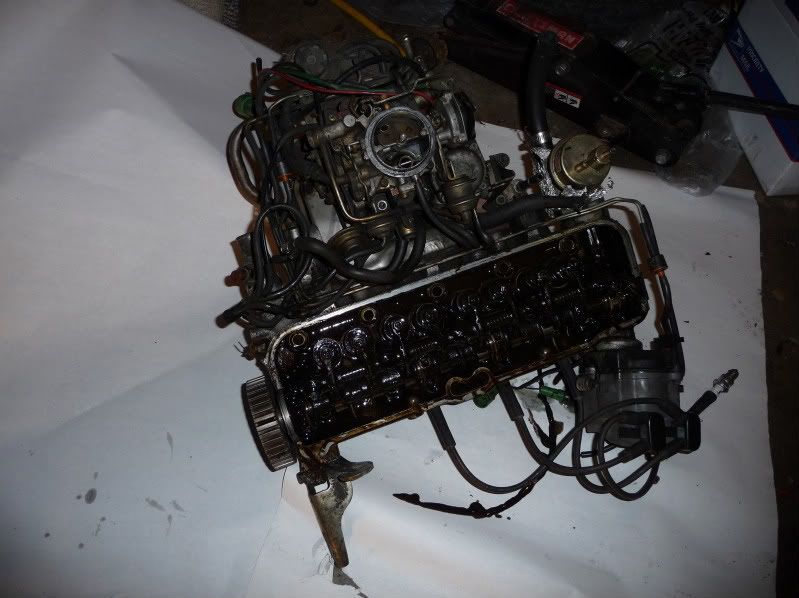
Head assembly removed all together.
13. Carefully set the head assembly down on some news papers and allow all the oil and coolant to drain. Use caution when flipping it over to exposed the gasket face on the underside. When you flip it over more oil, antifreeze and even gasoline will drain out of the head assembly. Use blocks of wood to prop up the head assembly securely so you can scrap the old gasket off without damaging any of the components you left on the head assembly, including the distributor.
Cleaning off the old gasket material off the head surface. Be careful not to gouge or scratch the aluminum gasket face.
14. I use a wide wood chisel as a gasket scraper. I have also used a metal plate with a sharp edge, and stiff metal putty knifes as scrapers as well. Be careful not to gouge the aluminum head surface. On really old gaskets it sometimes get tough to scrap it all off, I have used a stiff wire wheel in a drill. If you use this method, do it very carefully, you do not want to scratch up the gasket face on the head. Final cleaning can be done with a fine wire brush, carb cleaner spray and scotch bright pads.
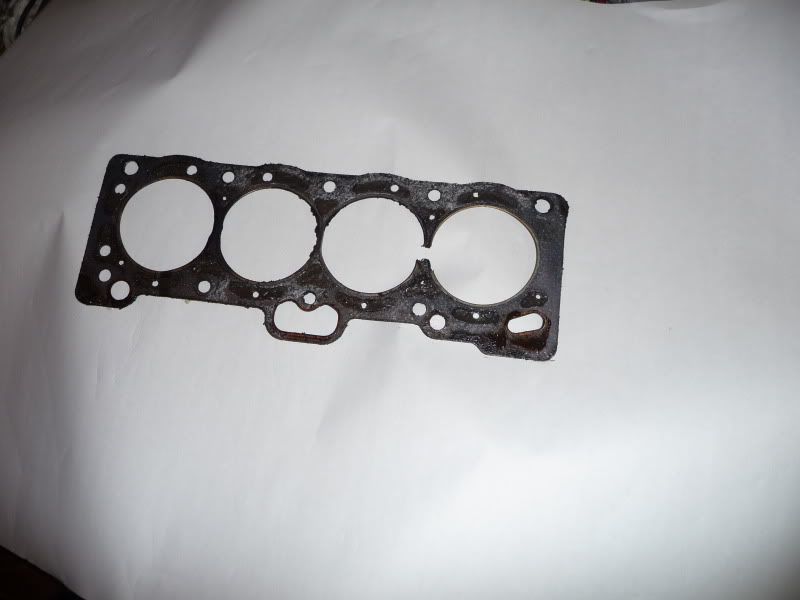
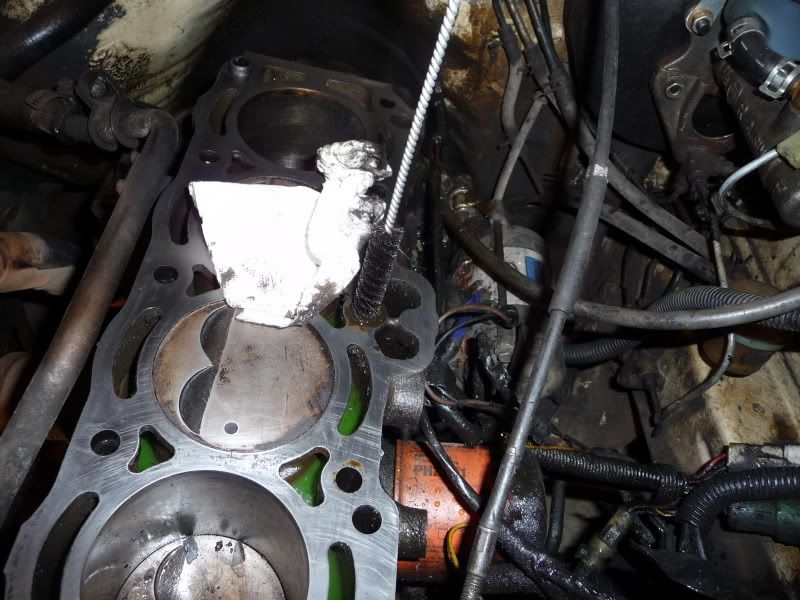
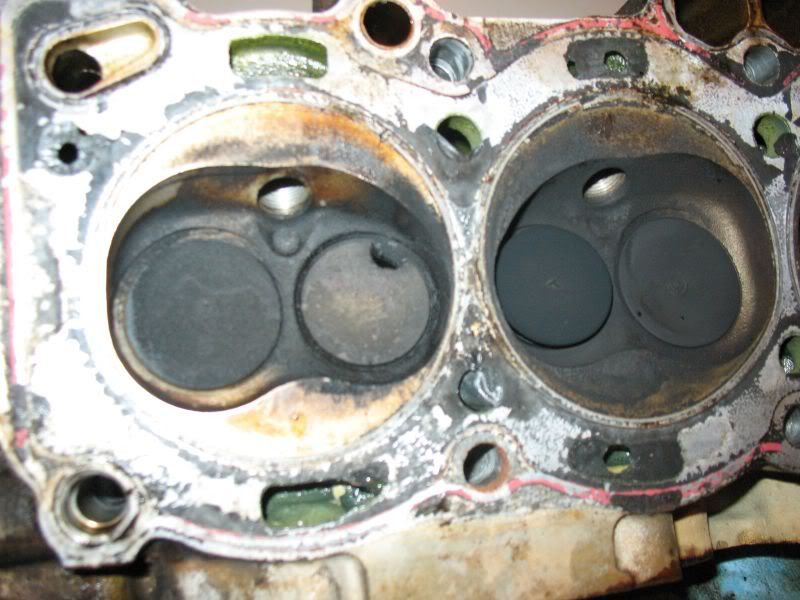
Here is a picture of the damaged head gasket, with the typical failure between the one and two cylinder (the hottest place on the head). This is a pretty severe failure, it was amazing I was able to keep it running up until than (it was barely running on two cylinders). Usually you will be sucking water into the number one cylinder before the gasket degrades this far.
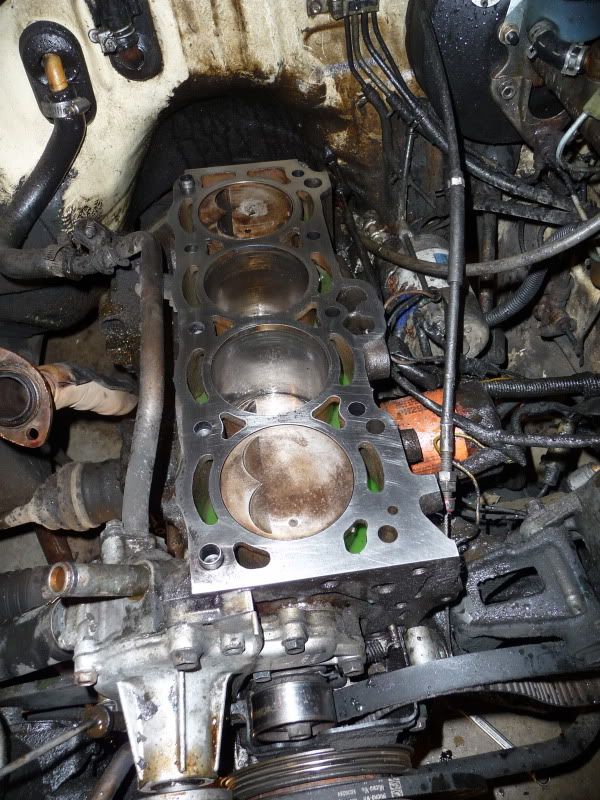
15. Use the same process to clean off the top surface of the block. A wire wheel in a drill will speed this up, and there is little risk of damaging the cast iron block. You can stuff clean shop towels down the cylinder bores to keep the debris out of the cylinders. I use the compressed air gun to blow these debris out, but if you do not have compressed air available it is easier to keep the scrapings out of the cylinders. There is no easy way to drain out all of the coolant from the block I just pick out the larger pieces, and blow out any debris from the water jacket as well.
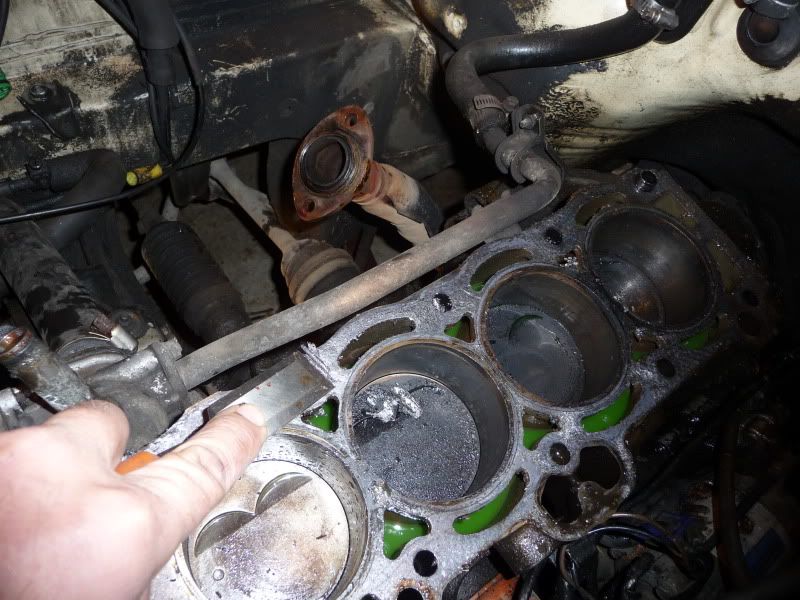
Scraping the old head gasket off with a wide sharp wood chisel. Notice how clean the top of the number one piston is compared with the other pistons. This is a sure sign of a failed head gasket, the coolant steam cleans the carbon off the piston. With a strong light sometimes you can see this through the spark plug holes when the pistons are at TDC before you pull the head off.
Next installment I will show you how to hand resurface the block surface and the head face, and do a better job than a machine shop.