==============================================================================================
From Lateer's 32/36 DGV Weber Carburetors, posted July 11, 2005
*Lateer*
Right.
After all the pushing and shoving on the forum, I've decided to write the definitive guide to the Weber DGV series carburetor.
This first post will include a short description of the carburetor, it's construction, a sample jet settings guide and a series of references for review.
Introduction
The Weber DGV series carburettor is a dual barrel progressive downdraught carburettor.
The various types are differentiated by their choke method and are mentioned below:-
The DGV is a standard manual choke.
The DFV is a mirror image of the DGV, for mounting on engines where the intake manifold is on the right of the engine. By mirror image, I mean that the carburettor performs identically, but everything is on the opposite side to the DGV. Most commonly found on Fords.
The DGEV has an electrically actuated automatic choke.
The DFEV is a mirror image of the DGEV.
The DGAV has a water actuated automatic choke.
The DFAV is a mirror image of the DGAV.
Each throttle valve is mounted on a separate shaft and they are of differential or progressive choke type. The linkage between the two throttle valves ensures that the secondary throttle valve does not open until the primary throttle valve is 2/3 open.
DAF, DFAV and DGAV types are equipped with a semi-automatic choke control. The carburettor is normally fitted to the engine as a single unit with both barrels feeding a common inlet manifold, the most common arrangements being a single unit feeding an inline four cylinder engine and a single unit feeding a v-type four cylinder engine
The carburettor identification mark is found on the lower flange outer surface.
Construction
The main body and cover of the DGV series are of die-cast aluminium or zinc alloy (Mazak) construction. The mounting flange is machined flat for fitting and the cover incorporates a mounting flange for the air cleaner assembly.
The throttle valves are of brass and the throttle shafts are of steel.
All fuel and air jets are of brass construction and are screwed into the main body. The emulsion tubes are also of brass construction.
Internal channels within the main body and cover are mostly drilled and are sealed with lead plugs where neccesary.
Performance
Most of the performance critera are improved byt he installation of a DGV Weber. Both mpg and horsepower are improved as the Weber has a very small input of fuel during idling and can open right up to larger than the standard Tercel carburetor.
A simple carburettor modification is not the first thing to do. As an ancient textbook on IDF Webers told me, it should be the last thing to do. Make sure your ignition system, fuel pump, rings and pistons, bearings and valve train are in good working order before you put the Weber on your car, as the carburetor will make all these systems work that much harder and possibly cause one to fail. Expensively.
Basically, performance with the DGV comes down to your right foot. If you're a leadfoot, then you'll push more fuel than is absolutely neccesary through the Weber and end up fouling plugs and coating your exhaust with fuel. If you're nice and lightfooted, then the Weber will only deliver the amount of fuel required, no more, no less.
One good idea is to listen to the note/sound of the Weber as you drive. Once you get it installed, you'll find that planting the accelerator into the floor at low rpm in a high gear leads to it bogging down and hesitating. You also get a low groan from the Weber. Doing the same at high rpm gives you a full-throated roar and pushes you back into the seat as the Weber gives the engine all it can take. Learning what the various notes mean is a neat skill to have. That way you can listen to what the carb is doing and either change up or down a gear to get best use of the engine.
Jetting
The Weber on my Tercel was sourced from a 2L Cortina and hasn't been altered since.
In the following jet settings, 1: indicates the primary barrel and 2: indicates the secondary barrel.
Aux venturi:- 1: 3.50 2: 3.50
Main jet:- 1: 1.40 2: 1.40
Idle jet:- 1: 0.60 2: 0.50
Air idle jet/hole:- 1: 1.70 2: 0.70
Emulsion tube:- 1: F50 2: F50
Air corrector jet:- 1: 1.70 2: 1.60
Accelerator pump jet: 0.50
Accelerator pump jet back bleed:- 0.30
Needle valve:- 2.00
References
Manuals
I used several manuals when researching the Weber carburetors.
The most useful are as follows:-
Weber carburettors owners workshop manual, J.H. Haynes and A.K. Legg., ISBN: 1850100616, 1850100209 (U.S.)
The Haynes carburettor manual., White, Charles., ISBN: 1859602886
Automotive Carburettor Manual (Haynes Techbooks), Chris Rogers, ISBN: 1859602886
The first on that list is the most detailed. Part 2, Chapter 7 deals exclusively with the DGV series Webers and I recommend seeing if your local library has it.
Online
<a href='http://www.google.com' target='_blank'>Google</a> will find most of the common information out there regarding Weber carburettors.
<a href='http://www.triumphspitfire.com/jets.html' target='_blank'>Triumph Spitfire</a> has the OEM jet settings for a whole heap of Weber carburettors. It's useful if you've bought a kit.
<a href='http://www.redlineweber.com/html/Tech/T ... ntents.htm' target='_blank'>Redline Weber</a> also has a good series of pages about general Weber info.
<a href='http://www.racetep.com/weber.html' target='_blank'>RaceTep</a> also has good info, but most of the stuff on the Web seems to be repetitive.
<a href='http://www.geocities.com/eraktoye/weber.pdf' target='_blank'>Weber tuning guide</a> taken from the first manual listed above. This has been the most use to me in servicing and tuning these carburetors. At the end of the file is a list of the OEM jet settings for the Weber I've got. If yours isn't listed, let me know and I'll see what I can find out. This chapter doesn't deal with the DGEV series, but they're so similar to the DGAV it makes no difference. If you aren't allowed to download it, then I'll see about putting it in a couple of other places. Maybe even here at Tercel4WD if I can.
Nothing beats a good manual that you can have open whilst you're taking things apart.
This post is by no means complete.
I'll also post some pics of my Weber conversion, but it's not that difficult. If you can take the carburettor off, you can put a Weber on.
Hope all this helps, and gets pinned, so I don't have to type it all again
--------------------
Typrus
How does having a Weber effect features like A/C, Power Steering, and the cold/fast idle? How much cooler or hotter does it run? How much actual emissions stuff is eliminated versus just things like the A/C idle-up?
What modifications are recommended in hand with this modification? I'll name a few and you can confirm/deny.
Stronger coil
High powered, lower resistance spark/ignition leads
NGK plugs (Preferrably Iridium's)
Along with checking for proper valve clearance (Should be done at 100,000 miles anyway)
Compression
Just looking for more info. Just tack anything important into the original.
How do you think this would deal with high-altitude? I live at 5400 or so. I might make the ocasional journey to 10,000 sometimes. How will it deal?
-------------------
Lateer
Typrus,
Regarding altitude, I have no idea. I regularly run my Tercel up to the top of Mount Wellington, and that's about 1250 metres above sea level, or something like that. It has no problems at all. I also generally run it around 700 metres above sea level as well. Again, no problems. Dunno what that is in feet.
Cold/fast idle you'll lose with the carb swap, unless you get a DGAV or DGEV Weber. The automatic chokes bring on fast idle. The manual DGV do also, but mine was a DGAV converted to have a manual choke.
Temperature doesn't change at all. My temperature tend to change with the winter/summer mix fuels, more than anything else.
The A/C idle up I have no idea. You might just have to set your idle high and hope for the best..
The Weber should be the last performance mod you make. It'll put heaps of strain on a standard ignition system, valvetrain etc. As I said in the pinned post, you should make sure all those are right before you put the Weber on.
------------
Typrus
Well, I knew you should make sure they are working right, but in reference to your statement that the exhaust will get soaked under heavy foot, I was wondering if a stronger spark would amend that.
------------
Lateer
I'm not sure about soaked. When my brother (who is a complete revhead) drives the car, I can smell fuel coming down the exhaust pipe.
The main problem is the Weber can dump way more fuel in there than there is air to burn. Hence, you get sooty, crappy plugs. At least, that's the way it was explained to me. The mechanic I was talking to demonstrated. If you plant the foot at idle, you can actually snuff out the engine.
Even the biggest spark in the world isn't going to help if there's not enough air.
-----------
Eatpants
does the water actuated choke put heaps of strain on standard ignition/etc ?
im thinking of doing this to my brothers tercel very soon (i dont want it rotting in the backyard over winter
-----------
Lateer
Not sure entirely what you mean, here.
The water actuated choke takes a line from the water pump and uses a thermostat-type device to open and close the choke butterfly valves and brong on fast idle.
Hence, I don't think it'll have any effect on timing...
------------
Typrus
I want a better flowing head. Dunno if porting has its place in a C-series head. I've heard from many places that in certain heads, like the G-series, porting will actually screw over flow.
Any thoughts?
------------
Lateer
Typrus, I've not had the chance to play with other Toyota engines.
I've only played with the 3A and 3A-C series engines, and as such I dunno about any other heads and how they'd go with porting.
I do know that the 3A-C used to be the stock motor for the older MR-2 sportscars, and I'm sure that they would have done some modification to them, so you might try looking about on the Web for mods for a MR-2.
========================================================================================================================
========================================================================================================================
DirtMagnet's "Intalling a Weber Carburetor"
Posted: 14 Aug 2005 01:29 pm Post subject:
Dirtmagnet--------------------------------------------------------------------------------
After installing the Weber yesterday, thought it would be a good idea to jot it down while it is fresh on my mind.
The Weber I installed is a 32/36 DGEV. This has an electric choke. Lateer has a great post explaining the difference between the models. I have an '83 SR5 w/3A. I did not buy the kit from Weber(#K740). I purchased a carb on Ebay, then bought the adapter, filter and linkage kit separately from Jam Eng.
Here are the numbers for the parts:
Weber # Description Cost
99217.331 Air Cleaner-short $20
99004.250 Adapter plate Toyota 3AC $33
99007.116 Universal linkage kit $23**See Note
Other items:
1ft of 1/4" dia fuel line
1 "tee" for 1/8" vacuum line(if your car has dual lines going to vacuum advance)
1ft of 1/2" dia heater hose(air cleaner to valve cover)
**Note: I did not use the linkage kit. I removed the linkage fron the stock carb and modified the bracket.
This install took approx 3 hrs, taking my time. I did not remove any emmissions stuff, but it is all disconnected. I left it just in case I had to go back to the stock carb. I do not have a catylitic converter and do not have to pass emmissions.
So far I am well pleased with the performance. Will get a couple of weeks on it and report back.
In the beginning.....

Remove existing carb, down to the fuel heater. I left this on for a couple of reasons. 1, if you remove it , the studs will be too long for the adapter. 2, The PCV valve is connected to the manifold.

Next I removed all vacuum hoses. I did leave the TSV hickey and the metal spider lines on for now. I went to Autozone and purchased the plugs to plug all exposed vacuum ports.

On the line from the carb to the purge canister, I currently have this hanging. Do not know if it should connect anywhere???
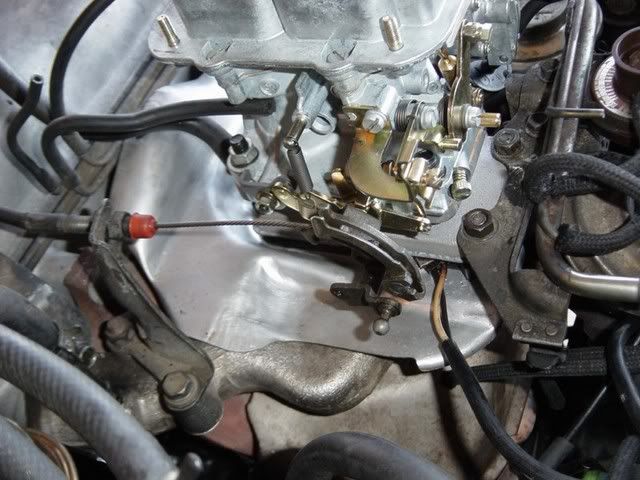
Install the studs supplied with the adapter into the adapter, then the adapter to the manifold. (gaskets are supplied) (sorry no pic) Remove the cable linkage from the stock carb and bolt it to the Weber. This can be left loose at this time, and will be adjusted and tightened when the carb and cable are installed. Bolt the Weber carb in place.

I modified the throttle cable bracket, by adding(welding) and extension to it. I used a washer welded to the end, then split it to get the cable through. This can be done other ways or you can use the new linkage kit. The reason I did not use the new kit is, you have to cut the end off of the stock cable. I wanted to keep mine stock in case I had to go back.

Route the cable through the new mount and attach it to the carb. Rotate the linkage until the slack is out of the cable. Tighten the linkage to the carb. Check the accelerator pedal to make sure the throttle opens and does not bind.
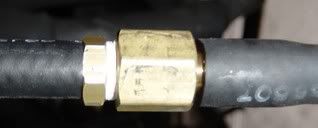
Install the new longer gas line.

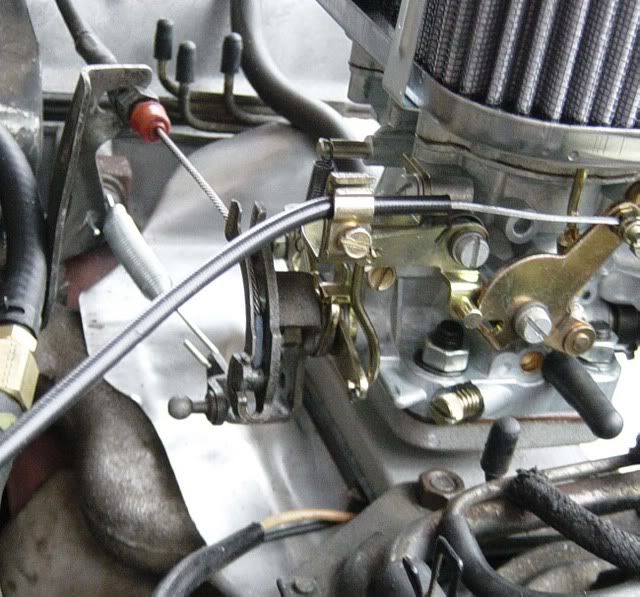
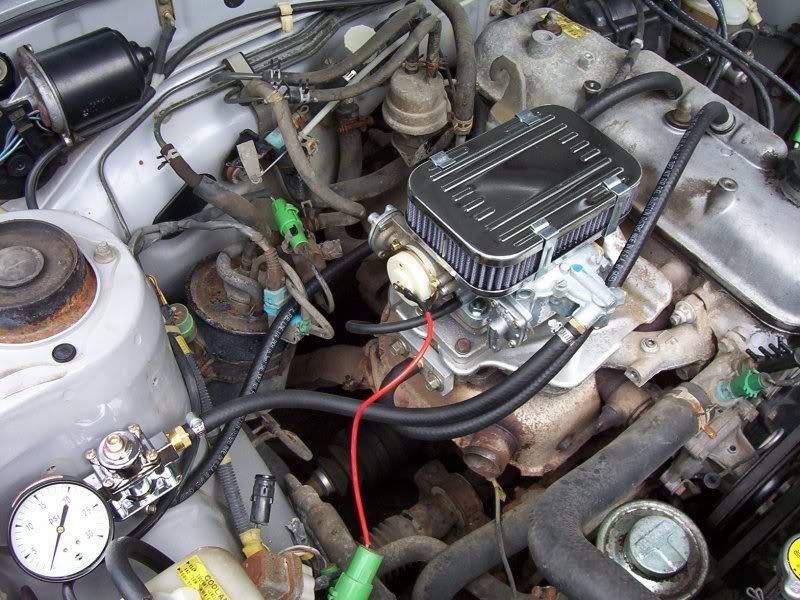
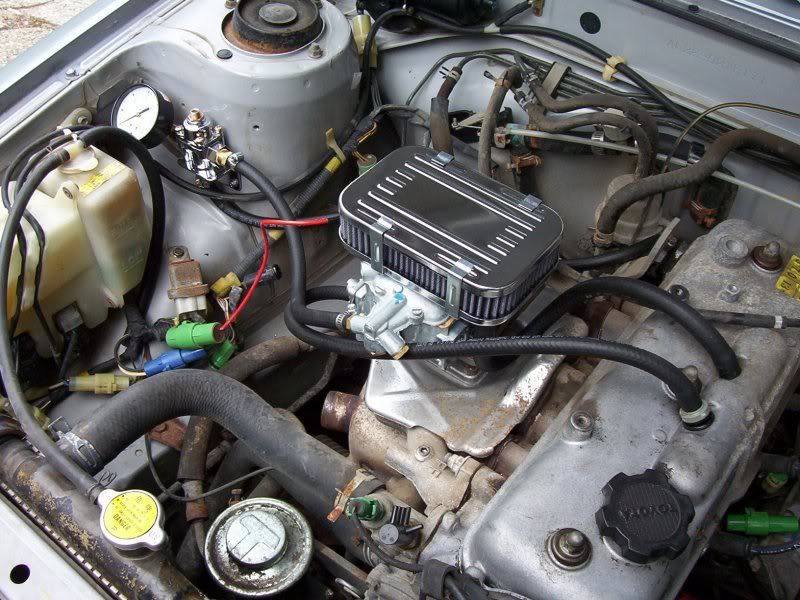
Use the existing wire that went to the choke(red), and attach it to the terminal on the Weber choke.
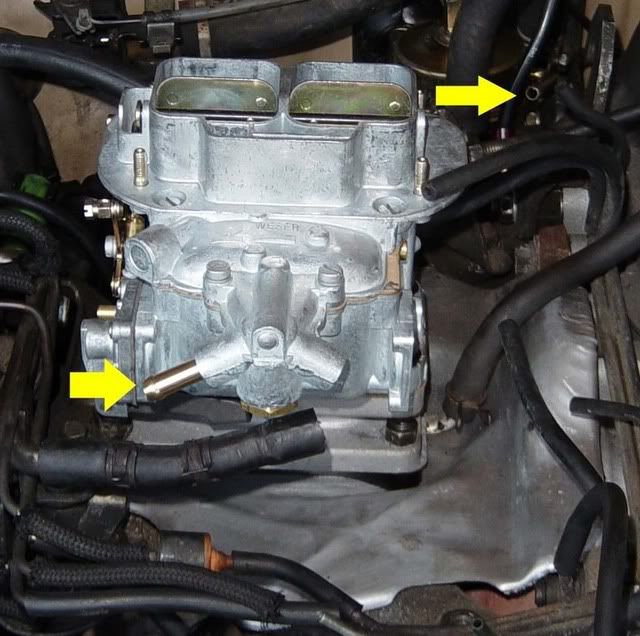
This photo also shows the adapter.

My Tercel has 2 lines going to the vacuum advance on the distributor. Right or wrong, I installed a “teeâ€
==================================================================================================
==================================================================================================
More goodies!
------------------------------------------
*splatterdog* from Weberrific! My Latest Install
Finished up last night on the 86. I love it when things start right up AND run good. Went a little different way on this one. I went with a holley regulator on the fender. My 84 has one of those dial regulators zip tied to the brake booster hose like I have seen others do. I blew the first one in 90 days. Luckily the 3/4 tank that got dumped out never ignited. Second one is still going but I think I will move it. The holley has a vent hole so that if it ruptures it will spray behind the gauge and run down the fender. Also less heat may prevent failure to begin with. Also you may notice my egr to pcv conversion. More hood clearance without that crumbly heater plate that impedes flow also. They look like a perfect piece for a vacuum leak too. The first pic also shows the marks to port match the adapter.
The car runs amazing now. I think the 84 is getting the same jetting which by the way is Mains-pri130,sec150 Air jet-pri170,sec180 Idle-50 on both. These were for 1000 ft elevation FYI. The jet kit instructions also has the secondary high speed tube get blocked off. Have to wait and see on mileage but I think it will be excellent. Cruises 65 mph with almost no pedal. WOT is just a little better than the out of the box jetted on my 84 but everything below that is way better.

----
Archinstl*
Sweet!
Clever PCV to EGR mount!
Can you ditch the vapor canister for more room/sanitary appearance?
What is that greenish plastic knob on top of the heater hose, between the valve and the firewall?
Tom M.
-------------
MickeyD*
That would be the connection for the Prestone cooling system flush kit that was installed by the owner before me. I never had a use for it, so it hasn't been undone for several years.
Splatterdog, I wouldn't recommend opening it unless you have some replacement for it. There's a chance that it wouldn't seal back up upon trying to close it.
I looked at it as it ain't leaking, don't mess with it.
------------------
splatterdog*
Well I did mess with it when I flushed it and yes it does leak now. Only a drop once in a while. So slow i wouldn't have known if I hadn't actually seen a droplet fall while doing this job.
The bit of tree hugger in me has me thinking on hooking up the evap system. Low on the list though. Timing belt kit and cam/crank seals and a pre-emptive water pump are next on the list.
I was on the interstate today and cruised 70-73 mph and still needed just minimum gas pedal to do it. The bottom end on this new carb is excellent.
Mileage figures are going to wait until I get over my happy foot.
-----------------
splatterdog*
I don't know if it's the carb or the pcv mod, but just like the 84, start up is smoke free now. Both had smoke that would indicate weak valve guides/seals(blue) before each received it's weber.
----------------
keith*
I'm curious about the fuel regulator. I was going to do one, but I put the gauge on without the regulator and only got 2.5 to 3 psi. Did you ever check yours without the regulator?
----------------
splatterdog*
I'm glad you asked. I can bottom the screw on the reg and still only get 3psi max. After everything gets warm it drops to 2.5. The only pressure spec I could find easily was from napaonline.com. They list 3.5-4.5 psi for their new pump.
My pump looks like it could still be O.E. so it may be getting weak but's still kickin and no breather hole spew. Never measured the 84. Got one of those chrome dial reg's in front of a napa pump and blindly trust it.
Also, previously I stated startup smoke was eliminated. Mostly true. It was almost totally eliminated on the 84 and greatly reduced on this one(was a yard fogger). Valve seals are on the list for both though.
Still want to get a couple of 7mm heat spacers too as both do have some hot soak/starting issues. Most likely due to the stock heater/spacer plate elimination.
I guess more than anything else the reg has provided peace of mind and the admiration of some people that don't have a fuel pressure gauge/chrome reg under their hood! haha. Even one "holy s***" from an autozone kid. He's obviously easy to impress.
Feel my wrath!(as soon as the snow flies....)
---------------
splatterdog*
The jet kit from racetep.com had the secondary enrichment orifice(top hole in secondary bore) get blocked off. An old trick they said. They suggested jb welding the hole in the air horn at the gasket side of the passage. I ended up tapping a small set screw into the carb body instead to make it easier to remove.
The fatter secondary main jet is supposed to make up for it. It seems a little better than my "out of box" weber. The larger primary idle jet made the biggest improvement.
------------------
eric555*
Alrighty then.. This is the enrichment hole that begins fuel pick-up from another hole in the float bowl, then leads up to a 90 degree brass fitting in the air horn? Rather than the vacume supply to the "power jet" plunger in the carb, I'm assuming.
One thing I think seperates Weber racing carbs from their "street-able" carbs are these little enricment circuits you find on the non-race carbs. One of my 32/36's used an idle cut off solenoid, while some of the other 32/36's didn't. Weird. I even saw a 32/36 used as a standard factory carb in Europe once. Although I can't remember where or which or when. Even the HP Books Weber Carb Book seperates the Weber line into racing and street versions. And they claim the 32/36 being intended for engines from 1147c.c.'s to 2000c.c's.
Good running carb.
I've never liked the enrichment circuits built into them. So, thank you for the info! That will have an impact on the final jetting specs for sure. But than again, so will being at 7200feet in New Mexico.
Thanks again.. eric.
--
One more thing.. Forgot to mention. In my experience once a 32/36 (and most any other carb that isn't oversized for the engine) is set up correctly for a given altitude, you should really only need to change the main and air correction jets when varying elevation. The loss of signal at altitude to the idle jets has always had me go back to sea level settings there. And the loss of compression and overall power has always led me back to a stock accelerator pump.
Small bore motocross 2-stroke engines actually need a richer progression circuit just to respond to anything but high RPM throtle. Learned that the painful way..
So when it comes to getting these 32/36's right at my 7200ft., I just multiply the sea-level mains by .94, and add 40 to get the air correction jets. Can't seem to improve on that..
Eric*
-----------------
Typrus*
I'm right about at sea level.
The 4-cylinder Pinto's came with a Holley 5200. Which is, in all actuality, a very cheaply made Weber 32/36 DFEV (reverse of the DGEV). I know, as I have one sitting in my garage.
I want to know what I'd need to do to get either a Weber 32/36 or a 38/38DGAS to run on a souped Terc.
If someone can run dual Mikuni-Solex 40mm sidedrafts (a total of 4 barrels) on a 4AC with nothing but bigger exhaust, I get the feeling a 3AC won't mind a 38/38DGAS too much.
--------------
Eric555*
Don't forget, I'm still a Newbie.. I don't know what manifolds are available for the 3AC, but I can give you enough of what I know to get you into plenty of trouble
Any engine can, and in my opinion should, run one throttle plate per cylinder. Now I forget exactly why you need such large throttle plate/venturis to avoid reversion with an independant throttle body (ITB) set up, but it's essential. Plus, you don't just add the throttle plate diameters to estimate the flow compared to a single dual barrel carb.
As far as I can guess, a set of 4 38 or 40mm carbs with 30mm venturi's would be a close guess as to what a 3AC might use. If that sounds a little big, keep in mind what TWM offers for Hondas. 50 or 55mm. throttle plates for a fuel injection set up! And that doesn't use venturi's, that's a 2" plus hole per cylinder!! So they'd like to sell everybody a 4 plate set up that's good for around 350hp. non-turbo..Granted, those are 4-valve, high revving engines.
Those will run because the fuel doesn't have to be drawn into the engine by vacume. But low end power will be sacrificed for the simple fact that the velocity of the intake air is so much slower at those low rpm's than otherwise. Good air fuel ratio or not.
ITB's get a bad reputation from such set ups. They're considered to be race track only pieces by most. The thing is, why have all japanese motorcycles use ITB's since forever?? Even on bikes made in the 60's, with engines that couldn't compete with the design ofthe 3AC. Why, because the carbs and intake were sized for driveability, plus performance.
The biggest problem that you'd run into is finding downdraft carbs with the float bowls facing forward like the 32/36 or the 38/38. Down drafts really aren't the easy way to go.
If I were to attempt to ITB's a 3AC, I'd look to motorcycle carbs. Anything in the 32 to 34 mm. range would be killer! Remember, motorcycle carbs don't use venturis, so the "size" is what you get. And if you could find some that have actual cable operated slides, not just vacume slides and throttle plates, those would be super cool. I guess the "SU type" would get better milege, but I've never tried to adapt anything with a vacume operated slide. But that's just me.
And, you can find bike carbs for free everywhere! The Honda guys are starting to grab fuel injection motorcycle throttle bodies to adapt to their cars. Some of the modern jap bikes are pushing over 180hp out of a 1200cc. engine. That'll typically be 42 or 44mm. bores, good for around 200hp. non-turbo (450 turbocharged).
Again,I'm a newbie here, and to Tercels. But I like the combination of great milege, 4WD and good, light handling. But after all, I'm not even sure if the intake manifold is water-jacketed in a way to make a project like this seem less than fun
Good luck.. Eric.
-------------------
Typrus*
The intake never sees coolant.
-------------------
Eric555*
No coolant. Cool. There's one nice thing about using street bike carbs for a custom project. The carbs need to use a soft mount. Which means whatever "stub outs" that you make for the manifold, you want to mount the carb by clamping silicone tubing to those stubs.
No other mount. Not anything solid at least. So what's cool about the soft mounts? They can soak up the misalignment between the Terc's intake ports and the carb's spacing.
If you do get into this, there's some easy engineering for the manifold length from the carbs to the intake valve head.
And if the carbs you find are a little on the big side, they can just be mounted furthur away from the valve head. Also, they use very low fuel pressure. Just like the Webers, or less, so the stock pump should work fine. If the stock pump is truly built for 7psi., then running 1 or 2 psi would let it put out a lot more flow.
Just be careful. I would find another manifold if you're truly going through with this. It's not worth the downtime for something like this. You will run into problems along the way. But it's doable. Eric.
------------------
Typrus*
Heh... Just keep in mind that the intake and exhaust mesh, and whatever intake flange you come up with needs to be the same thickness as the exhaust, or else neither one will tighten fully.
Someone makes a Weber sidedraft manifold for the 4AC, which will work on the 3AC.
-----------------
Eric555*
I better go take a look at mine.. My idea was to chop the intake manifold about a half inch from the head, use it as a flange, and have some thick sections of aluminum tubing welded around each port to create "stubs" to clamp silicone hose sections to.
Any welder could do that. It wouldn't be a bad idea to include a vacume nipple into each for carb syncing and a signal source. As a signal source, all 4 get merged together..
Eric.
BTW Typrus. Thanks for listing the Tercels you've crashed.. There's no glory in boasting about our mistakes, but there's no honor in trying to cover them up.
I've destroyed 10 cars in my time. But I've also save countless accidents from happening. Some while I was just minding my own buisness even! All of them a result of the skills I've gathered en route to destroying those cars..
There's a saying among my car-motorcycle buddies around here. Those of us who accept the fact that if you're going to play, you gonna pay.
Wether it's a blown engine, a balled up project car, or a broken body part, it's simple. "That's racing..."
Eric.
---------------
trevmountain*
Wow that is exactly what I want to do. It looks better and it makes for more room in the engine compartment. I'd like to do the egr conversion as well, is it rather difficult or not to bad? Also was wondering what benefits you get running a fuel regulator, I assume it's for better fuel pressure correct. I didn't get the jet kit I figured I'd see how it does out of box and if needed I could add the kit later for better performance. Also I never did mention but I've got a 2 inch custom exhaust all the way with a high flow cat and a gibson super flow muffler, maybe the jetting I get will relate to the exhaust somehow. Well thanks for the pics it'll give me a goal to shoot for and hopefully I can pull this off with out any help but I'm pretty new to this stuff we'll see how I do hope to start in soon.
Trevor
----------------
splatterdog*
EGR to PCV is pretty easy. I used a small bar of aluminum. Match drilled the bolt holes to the old egr valve then did the same for the center hole. The center gets drilled and tapped with a 1/8 npt pipe tap, which luckily is the cheapest pipe tap if you don't already have one. Then add a brass hose nipple and hose. Breather hose goes to plastic bushing on bottom air cleaner pan. There's two tight bends, just use the natural curve of fresh off the spool hose and it won't kink.
Now on the exhaust manifold end. Take the large "banjo" bolt that attaches the egr pipe to the autoparts store. Match it up with the same size transmission filler plug. It is a 20x1.50mm (napa part#704-1046).
The regulator is just to protect the carb from too much pressure. It would seem they are not necessary as I can bottom out the adjuster screw and still only get 2.5 out of it. Better safe than sorry IMO and it looks cool! Even with regulators I had to lower my floats a bit to prevent spillover. Next time I need any parts I will also be getting viton tipped needles as well for better fuel control.
=================================================================================================================================
=================================================================================================================================