Simple Cylinder Head Touchup
I’ve messed around with a few Tercel heads when re-ringing an engine or replacing a blown head gasket. I’ve taken some to an auto machine shop for leaking valve tests and had a couple milled. The main man at the shop told me the heads were all in good shape and could have been reused without having anything done to them. One of them had 303,000 miles on it.
I decided to follow his advice to some extent. The last two times I blew a head gasket I laid a straight edge on the heads and tried to shove a .0015” feeler gauge under it at about 10 places with no luck. That is a good thing. Both heads were flat. I checked diagonally both ways and straight along both sides. Of course I carefully removed the old head gasket remnants using a head scraper and razor blade first. You can get head scrapers pretty cheap at auto stores but you will have to sharpen ‘em now and then. Note#1 : FSM maximum tolerance is .002”
Last week I decided to work on the collection of old heads I had stashed in the shop. I suspected one of the five heads had a burnt valve so I had the machine shop do a vacuum test. They did it for free and let me watch. The head had a burnt #3 cylinder exhaust valve. I was impressed with the machine he used so I looked them up online and found they were pretty expensive. I found where someone had said you could make your own out of an old refrigerator compressor or an air compressor pump. I had an old homemade air compressor someone gave me a while back so he would not have to haul it to the dump.
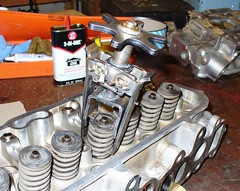
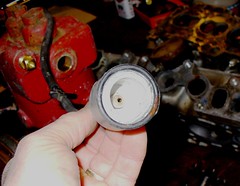
I rigged it up and used a vacuum gauge that I’ve had for thirty-five years and never use. Check out the picture. The aluminum part set on the head is over the manifold opening, you just turn on the motor and the sucking begins. It kind of works like a stethoscope, you press it to the head and if there is good vacuum it will become attached to the head by the suction and the vacuum gage needle will rise to at least 24. 24 is the recommended minimum according to the machine shop.
The head I had done at the machine shop had the numbers written in marking pen next to each valve. Several were marked 15-17 and were considered bad. My set-up did not give those readings. Mine read 19-22. The good ones that were marked 24-25 all read 28 on my gauge. I could also tell the difference in the sound of the compressor. When a valve tested good I could tell the compressor was working extra hard.
I took my homemade valve spring compressor and removed all 8 valve springs. Before removing the valves I drilled ( 8 ) 5/16” dia. holes in a piece of scrap 2 x 4. I wrote in marking pen, on the board, the number of each valve (1 thru eight) and marked “front” by number #1. It’s very important to make sure the valves go back in their original locations. I found this out the hard way. On one of the heads that I was almost done with, I accidently knocked the board with the valves off the workbench. Only three of the valves stayed in their holes. I had to guess where the other five went. I guessed wrong on three. The vacuum test failed on those three so I had to do a process of elimination switching the three around until the vacuum passed.
After removing the valves I pried off the valve stem seals, they were not pliable but stiff and brittle from age. I used a gun barrel cleaning rod with a cloth patch to clean out the hole the valve stem slides into (aka. valve guides). Then I chipped off the debris that collected on the underside of the valves and wire brushed them. I lightly oiled the valve stems. I took the first valve and carefully smeared some valve lapping compound around the seating portion of the valve then inserted the valve back into the head. I tried using one of those valve lapping tools that have the little suction cups on the end but it did not stick very well to the valve face and I became frustrated trying to spin it back and forth while it kept losing its grip. I grabbed the battery powered drill and tightened the bit down over the end of the valve stem. Then with the head lying on its side I gripped the head with my right hand simultaneously pressing my index finger on the valve face. Then holding the drill in my left hand I ran it at semi-slow speed forward and reverse in short cycles about 4-6 times. The valve spun under my finger as I was pressing it down.
The valve lapping compound polished the valve seat (in the head) and the valve seating surface on the valve. When I checked the valves with a magnifying glass the intake valves polished up very nicely but the exhaust valve had lots of minor pitting mixed in with the shiny polished areas. The minor pitting did not matter as they all tested fine under vacuum. I had read somewhere that you just needed to touch them up, not overdue it.
I was careful not to let the valve lapping compound spread around too much. That stuff would do nasty things if it got into the engine so I used a lot of paper towels to wipe it off the valves and the valve seats and washed my hands often.
Cleaning the heads before re-installing the valves is a pain in the … I went the extra step and removed the copper plugs (4 in front, 2 in back) so the oil pathways could be cleaned out with that gun barrel cleaning rod. Most of the Tercel heads have plugs but occasionally one will not. Those heads have non-removable plugs. The copper plugs are very tight so use a good quality Allen wrench. I use a big crescent wrench as a cheater to get the leverage needed to break them loose. They usually make a snapping sound when they break loose (when parts are cold). I have found that heating the aluminum immediately around the plug with a propane torch helps ease the power needed to get them to turn (and they do not make the snapping sound).
Re-assembly is painless. Install the new stem seals then lightly oil the valve stems and insert valves into the head. Set the thin washer in head valve spring seat. Install valve spring with its top and install the two retainers. Do the vacuum test. If any test less than 24 you will have to redo the lapping. Once everything checks out re-install the copper plugs.
Note#2 : This process has worked well for me so far. It can only be done to heads that are in reasonably good shape. If any of the valves are burnt you will need a new valve and the valve seat will need to be re-cut by a machine shop to suit the new valve. If the head is warped beyond FSM tolerance it may have to be scrapped. You may choose to do all the other tests in the FSM while you have it apart, checking valves, checking springs, checking valve guides etc.
Note#3 : Out of at least 8 heads played with none were warped over the FSM .002” max. tolerance. Several of them had been very hot when head gasket blew. None have been cracked.
Note#4 : When cleaning the head you may want to chip out the accumulations around the exhaust valve guides (in the ports).
Note#5 : I used Felpro head kits that I got from Rock Auto for about 53.00. The Felpro’s have worked well for me. They include cam seal and lots of gaskets. I tried a few others where I only bought the head gasket with not so good luck. Do not know Mfr’er.
Note#6 : Out of the five heads three were fixed up as described. The other two had problems. One had a burnt #3 exhaust valve (1/4” dia. hole on edge) the head also did not have removable plugs for the oil pathways so I will probably not fix it. The other head had a leaking #4 intake valve. The seating edge of the valve was not flat but slightly dished. I plan to discuss it with a machine shop.
http://farm5.static.flickr.com/4032/435 ... 5805_m.jpg
http://farm5.static.flickr.com/4071/435 ... f677_m.jpg
http://farm5.static.flickr.com/4038/435 ... 16c5_m.jpg
Simple Cylinder Head Touchup
-
xirdneh
- Highest Ranking Member
- Posts: 2121
- Joined: Thu Aug 04, 2005 11:38 am
- My tercel:: 87 tercel 4x4 wagon w/reringed engine, 83 tercel 4x4 wagon w/salvaged engine and 4.1 Diff's
- Location: seabeck, washington, USA
Simple Cylinder Head Touchup
Love those Tercell 4x4 wagons but they sure suffer from road noise.
-
Petros

- Highest Ranking Member
- Posts: 11933
- Joined: Sun Jan 28, 2007 6:31 pm
- My tercel:: '84 Tercel4wd w/extensive mods
- Location: Arlington WA USA
Re: Simple Cylinder Head Touchup
It is possible to do a home resurfacing job on your head if the warpage is not too high. I use a large peice of scrap granite counter top I got at a garage sale, you can also buy a peice from a place that installs granite counter tops, they sometimes even give you a peice.
I clean the old gasket off, tape a sheet or two of 600 grit wet and dry sand paper to the smooth face of the granite, and than with solvent, paint thinner or similar on the paper, slide the head back and fourth over the sand paper. I like using a figure eight mostion on the head. This actually gives a more smooth surface than a machine shop finish. When the whole surface has the same smooth sanded texutre, it is flat.
You can also do something similar to the top of the block, I use a 4"x8" peice of polished granit tile wrapped with 800 grit wet and dry, and with carb cleaner or paint thinner stoke back and fourth over the top of the block until it is all even and smooth.
You also can resurface the valve face and seats if they are not too badly pitted in a similar way. You use lapping compound (NAPA sells it), it is a gritty paste you put on the face of the valve and than turn it back and forth while putting pressure on the seat. I have also used a drill by chucking the end of the valve stem in the drill and spinning the valve in place. With the lapping compound it will grind a new surface into the valve and seat. This only works of course if they are not too badly worn. A sloppy valve guide (which should be replaced), warped or badly burned seat or valves have to professionally reground. But this method works with simple tool you have in your shop. Make sure you keep the compound off the stem and out of the valve guides, and clean it all off well when you are done.
'87 Tercel 4wd SR5 (current engine swap project)
'84 Tercel 4wd (daily driver, with on going mods)
'92 Mazda MPV 4wd (wife's daily driver)
'85 Tercel 4wd DLX auto(daughter's daily driver)
'01 Honda Civic (other daughter's daily driver)
'84 Tercel 4wd (daily driver, with on going mods)
'92 Mazda MPV 4wd (wife's daily driver)
'85 Tercel 4wd DLX auto(daughter's daily driver)
'01 Honda Civic (other daughter's daily driver)
-
ARCHINSTL

- Goldie Forever
- Posts: 6369
- Joined: Sat Apr 30, 2005 1:52 pm
- My tercel:: Goldie is a 1986 SR5 attualmente con Weber/also owned the first T4WD in STL in late '82
- Location: Kirkwood, a 'burb of St. Louis
Re: Simple Cylinder Head Touchup
Just - Wow! Thanks!
Tom M.
Tom M.
T4WD augury?
"Oh, do not ask, 'What is it?' Let us go and make our visit."
T.S. Eliot - "The Love Song of J. Alfred Prufrock"
"Now and then we had a hope that, if we lived and were good, God would permit us to be pirates."
Mark Twain
"Oh, do not ask, 'What is it?' Let us go and make our visit."
T.S. Eliot - "The Love Song of J. Alfred Prufrock"
"Now and then we had a hope that, if we lived and were good, God would permit us to be pirates."
Mark Twain
-
sdoan

- Top Notch Member
- Posts: 392
- Joined: Sat Jun 23, 2007 2:02 pm
- My tercel:: 1983 Tercel 4wd DLX 2nd owner (sold), 1984 SR5 3rd owner (sold), 1984 with 4A engine and factory sunroof SR5 3rd owner.
- Location: Bellingham, WA
Re: Simple Cylinder Head Touchup
Nice write up Xirdneh,
Also liked the clutch write-up. I had no idea that there was so little tolerance for thicker clutch disks.
A friend works on old Fiats and Citroens (Including Topolinos and 2CVs). Apparently they needed to mill the mating crankcase halves (aluminum) and the solution was to rub them down on a large flat tile (no sandpaper). You can get some tiles 2'x2'. When he told me this I was able to seal the oil bath chaincase for my old Ariel. I started with a tile but found it too slow so switched to a large cement block. The chaincase has been oil tight for years. have a hose run running water over it to wash away any shavings or loose grit.
Another way to use the sandpaper is to stick it to plate glass using a spray adhesive.
-
Highlander
- Top Notch Member
- Posts: 413
- Joined: Wed Mar 12, 2008 8:22 am
- Location: Nederland, CO
Re: Simple Cylinder Head Touchup
I like the thought of the Cement block, but am leery of off- weighting when you get to the end of a stroke causing a dish in the center (or thinner spot). I just recut the valves and seats on the head to the '83s original engine (its back in, just waiting on a new radiator) and trued up the head on a piece of 1/2" blanchard ground 6061-T6 with fine lapping compound -that'll work for a couple of heads, but it wears out the plate as well. I found that the valves had a REALLY WIDE seating area after 230,000 miles, so since I will need a seat and valve grinder for the Sprites, I found one of each on craigs list.
Being an Ex-Machinist sure pays off now and then, the last time I cut seats and valves, I had no idea what I was doing (over 30 years ago). Now, I know what I'm looking for and have the tools.
That head is now ported (slightly) the combustion chambers are cleaned up and the valves are all lapped in with a .07" seat all around.
Does anyone know what the F is up with the notches in the two inner intake ports right at the manifold surface? I smoothed them and opened up the manifold gasket to match- it just looks like one big vortex generator sucking your airflow velocity down (but just on the center cylinders).
I can't wait to start that engine up, break it in, and put the 32/36 on it!
Another thought- I'd be careful how much I take off of the head, as it retards the valve timing relative to the crank- if you take a significant amount off, you could just be shooting yourself in the foot, so to speak. (Fire suit ON)
'83 SR5-299K, -tRusty!
'85 SR5-265K--GOLD
'85 SR5-285K-- GOLD-New engine!
'85 SR5-238K -- Teal-Killed by a DD
'58 and '62 Austin-Healey Sprites
'85 SR5-265K--GOLD
'85 SR5-285K-- GOLD-New engine!
'85 SR5-238K -- Teal-Killed by a DD
'58 and '62 Austin-Healey Sprites
-
Petros
- Highest Ranking Member
- Posts: 11933
- Joined: Sun Jan 28, 2007 6:31 pm
- My tercel:: '84 Tercel4wd w/extensive mods
- Location: Arlington WA USA
Re: Simple Cylinder Head Touchup
I have seen those little flats on the intake ports, I suspect they are there for indexing the NC controlled machining process when they are making the production heads in the factory. The whole process is automated and no human ever touches them, and a rough casting has to have something for the machine to index off of before it starts cutting metal away. You will not harm anything my grinding them away, I did that on my highly modified head.
I have taken quite a bit off my cylinder head when I have resurfaced mine several times. When you lower the head on the engine the valve timing gets slightly retarded. I did a calculation once and it retards the timing something like a half a degree when you mill off .040" from the head. I do not think that would be noticeable, but retarding the cam timing will actually improve the low end torque anyway. The effect of changing the valve timing is to move the peak torque point up and down the rpm range, but the curve is pretty flat on these engines anyway, so I doubt you would notice the difference. It might show up on an engine dyno test, if you could get repeatable conditions. If you are worried about it they do make adjustable valve timing sprockets where you can adjust it for optimum performance (they are pretty pricey). I was going to put them on my 4age I am planning on eventually putting in my T4wd, with twin cams I can adjust them separtately. the 4age power occurs at very high RPMs, so to lower the peak torque rpm I was going to retard the intake cam the max the adjustable sprocket will allow, and advance the exhaust sprocket the max, that reduces the overlap, and lower the peak torque point on the rpm curve.
I have taken quite a bit off my cylinder head when I have resurfaced mine several times. When you lower the head on the engine the valve timing gets slightly retarded. I did a calculation once and it retards the timing something like a half a degree when you mill off .040" from the head. I do not think that would be noticeable, but retarding the cam timing will actually improve the low end torque anyway. The effect of changing the valve timing is to move the peak torque point up and down the rpm range, but the curve is pretty flat on these engines anyway, so I doubt you would notice the difference. It might show up on an engine dyno test, if you could get repeatable conditions. If you are worried about it they do make adjustable valve timing sprockets where you can adjust it for optimum performance (they are pretty pricey). I was going to put them on my 4age I am planning on eventually putting in my T4wd, with twin cams I can adjust them separtately. the 4age power occurs at very high RPMs, so to lower the peak torque rpm I was going to retard the intake cam the max the adjustable sprocket will allow, and advance the exhaust sprocket the max, that reduces the overlap, and lower the peak torque point on the rpm curve.
'87 Tercel 4wd SR5 (current engine swap project)
'84 Tercel 4wd (daily driver, with on going mods)
'92 Mazda MPV 4wd (wife's daily driver)
'85 Tercel 4wd DLX auto(daughter's daily driver)
'01 Honda Civic (other daughter's daily driver)
'84 Tercel 4wd (daily driver, with on going mods)
'92 Mazda MPV 4wd (wife's daily driver)
'85 Tercel 4wd DLX auto(daughter's daily driver)
'01 Honda Civic (other daughter's daily driver)