here i'm going to post what is involved in a 4A-C swap for other users of tercel4wd.com, I'll be updating this post as i get questions as i'm sure i'll miss a few minor points...
tools:
A basic selection of tools will suffice, but the more tools you have the easier it will be to complete the swap. at the very least you should have a metric socket set, a set of box wrenches, a pry bar, soft mallet and screwdrivers.
Idealy, aswell as the above list you should have a set of swivel sockets, impact gun (eletric or air) torque wrench, large magnetic bolt tray, gear wrench set (handiest little wrenches ever) 1/4" ratchet, assorted 1/4" and 3/8" extensions, torque wrench, breaker bar and a complete set of pry bars.
supplies:
just like the tools, the more the merrier, degreasing the engine bay and engine isn't nessisary, but really helps keep things clean.
Basic supplies include: something to hoist the engine with, silicone gasket stuff-- hi temp for exhaust and regular for the oil pan, a bag-o-rags, and some brake clean to prepare surfaces before you use the silicone.
Ideal supplies adds, engine stand, nitrate gloves to keep your hands clean, engine shampoo, razor blades & holder to scrape off old gasket stuff, lots of brake clean and carb and choke clean, penetrating oil, anti-seize, sand paper to clean crud of coolant lines, abrasive pads to scrub off old gasket junk, black 3M pad on a drill to prep surfaces and masking tape to lable vacuum lines.
Removal of the 3A-C
pretty straight forward, just take your time to avoid any mistakes.
-disconnect battery
-remove hood
-spray some penetrating fluid on all the bolts first to help you out.
-support engine with chery picker, come-along, etc
-support transmission front diff with a jack of some sorts.
-remove the four 17MM bolts holding the engine to the tranny
-remove the two 19mm bolts on either side of the engine holding the engine mounts in place (four in total)
-remove the 10mm bolts holding the engine shock in place
- remove the exhaust from the manifold, i beleive these are 12mm, but your probably going to have to remove them with vice grips. there is also a bracket holding the exhaust to the transmission, remove this also.
-there are four 14mm bolts holding the engine to the tranny on either side of the engine, remove these from the engine, loosen the ones on the tranny
-disconnect fuel lines and note their location (mark with masking tape if nessisary
-drain coolant and remove hoses going to heater core and radiator
-disconnect wires and remove starter, the starter is held in place by two bolts, i beleive they are either 12mm or 14mm
-there is one 10mm bolt securing the line going to the heater core to the tranny, its on the RH side of the car and is easy to miss.
-remove the radiator, you can leave the rad support in place, but it helps to remove that too.
you are now ready to start removing the engine, check as you go, if the engine dosn't want to come out, you might be forgetting something, take your time. Keep in mind once the engine is out, the trnamission is no longer supported up front, i ran a piece of plywood under the front diff and across the two front suspension braces that run 45 degrees to the car so that i could push the car around.
the engine:
heres what will have to be swapped onto the 4A-C from the 3A-C
-intake manifold(don't worry, its not as hard as you think)
-oil pan and oil pick up (more time consuming than anything)
-engine mount brakets (they only go on one way)
-flywheel (this is where the impact gun comes in handy)
-dust shield plate behind flywheel
-alternator (might be differant, might have to swap the pulleys due to the use of a differant belt like in my case)
-EGR, you might have to like i did, mabey not.
-if its an AE-86 4A-C, you'll have to swap the oil pressure sender otherwise your oil light will be on all the time.
keep in mind your going to need a new intake/exhaust gasekt, this would also be a good time to change the clutch and timing belt. if funds allow.
after all this is swapped in from one engine to the other you should be ready to swap it back in.
side notes:
-use the hi-temp silicone sealant on any exhaust related parts
-use anti-seize on all any bolts that were seized coming out, so they go in easier
-cafeful not to break the bolts holding the intake manifold to the exhaust manifold, use penetrating oil and steady pressure.
-on my 4A-C i had to remove an extra pulley thing that was bolted onto the end of the crank pulley.
-I also had to remove the fan and fan clutch
-i had to remove a stud on the LH side of the engine so that i could bolt on the bracket holding the engine and transmission together.
-if you have a digi cam, take lots of pictures to refer to when it comes time to reinstall the engine.
Misc Torque specs im Ft. Lbs. (1A-C, 3A, 3A-C, 4A-C):
-cyliner head bolts: 40-47
-Main bearing bolts: 40-47
-Crankshaft pulley bolt: 55-61 (1981-1983 engines 80-94Ft.Lb)
-Flywheel-to-crankshaft bolts: 55-61
-Intake/exhaust manifold bolts: 15-21
if you see any mistakes or something i missed out, let me know and i'll change it
how-to: 4A-C swap
4AC swap
The 4ac swap I did required a pan and flywheel swap.There is a sealant product called "The Right Stuff" It is a fiber reenforced silicone in an aeresol "whipped cream can.Very good stuff for the pan.
My 4ac came with a larger flywheel,so I swapped the original.While it is on the bench,a freeze plug heater is a good thing.So is a rear main seal.Other than that,I used the 4ac long block and swapped the rest over.
Becaause its easier on the bench,I did a new water pump,timing belt and tensioner,thermostat,belts,hoses,etc..Try to locate the molded hoses to the heater core ahead of time.
A useful trick is to buy 2 long bolts the right size for bellhousing bolts (14mm?) and cut the heads off.They can act as guide pins sliding the motor,trans together..That rubber flap motor to trans gets hard and will fight you.Mine finally fell off.I cleaned up surfaces with laquer thinner and glued it in place with "Rigjht Stuff".Its working.kamiphloj
Like my old Volvo 544 with 4wd.I seldom regret neversieze or threadlocker

It isn't the same head. It'll mount up, but the 4AC has bigger stuff. More flow. Yeah, the 3AC head would probably give compression a bump, but thats manily because it wouldn'r be wide enough at the cylinder wall.
I believe anyway.
I believe anyway.
RIP 10-07- 1984 Toyota Tercel SR5 4wd Wagen 6 speed
RIP 04-05- 1986 Toyota Tercel SR5 4wd Wagen 6 speed
1st Terc- 1987 Tercel SR5 4wd Wagon 6-speed, Sadly cubed
1985 Tercel Standard 4wd Wagon w/ 3-speed auto, Living a happy life in Boulder last I knew
RIP 04-05- 1986 Toyota Tercel SR5 4wd Wagen 6 speed
1st Terc- 1987 Tercel SR5 4wd Wagon 6-speed, Sadly cubed
1985 Tercel Standard 4wd Wagon w/ 3-speed auto, Living a happy life in Boulder last I knew
-
Mac
- Highest Ranking Member
- Posts: 809
- Joined: Wed Apr 06, 2005 12:02 pm
- Location: surrey, BC, canada
I have no idea about the heads, but i'll have a lookie in my chilton manual.
I'm actually planning on doing a P&P and rebuild on my 3A head and putting it on the 4A block for more power (why else? )
)
I'm actually planning on doing a P&P and rebuild on my 3A head and putting it on the 4A block for more power (why else?
Tercel 4WD "POWER WAGOON" with 4A-C
aka: "no powa steering tercel, oh oh oh!"
mods: ignition at 10 DBTDC and 90 octane gas.
aka: "no powa steering tercel, oh oh oh!"
mods: ignition at 10 DBTDC and 90 octane gas.
I would like to add some pictures from my swap, and a few suggestions.
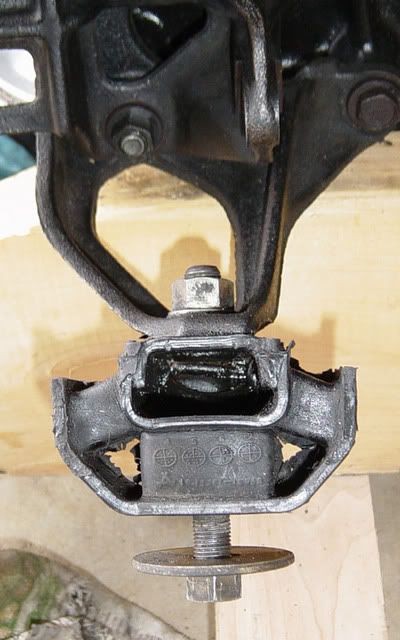
The motor mounts slip into slots on the sub frame.
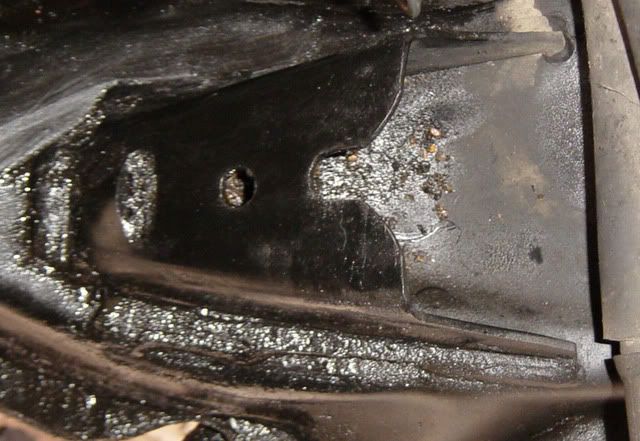
Only two nuts need to be removed this way, only one has to come completely out, the other can just be loosed to almost off. I remove the one on the passenger side because it is easier to get to when putting the engine back in. Its difficult to start the nut under the AC compressor.
You can see the studs sticking out of the motor mounts at a 45 degree angle on each side and the nut and washer still attached on one side. When re-installing the engine, you may have to rock the engine a little to get the washer under the slot, but its not hard to do.
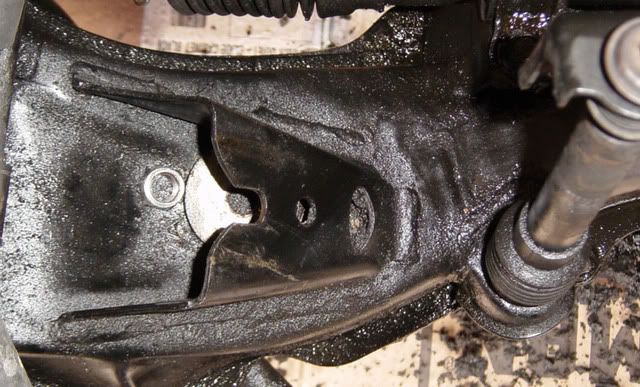
This is the passenger side mount bracket, you can see that I just left the washer and nut in it so I wouldn't loose them. When installing, get the drivers side mount in first, then this will just slip in place.
This is the motor mount on the drivers side with the washer and nut still attached. Leave the nut and washer on this side, there is little room to maneuver. You can slip the engine in place with the washer and nut on one side, this is the side to leave on.
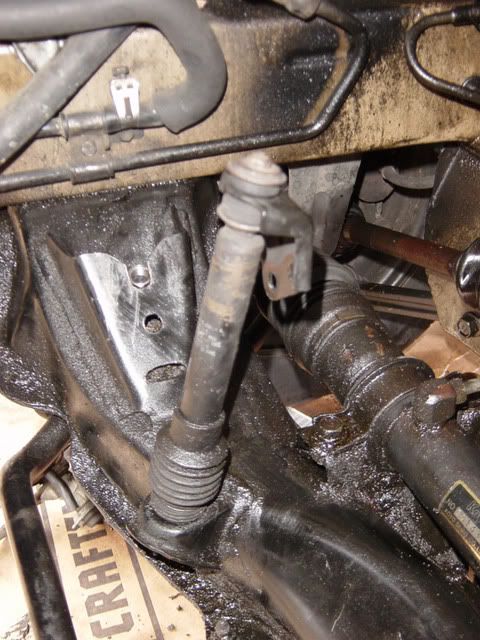
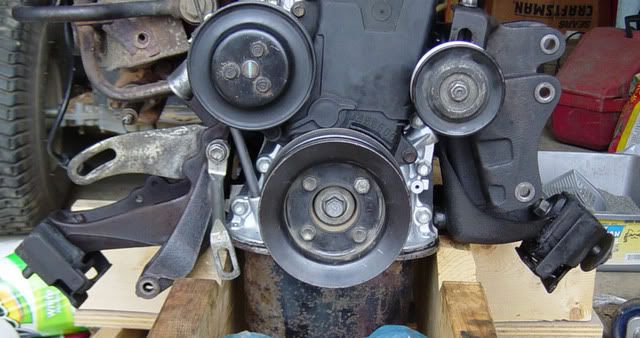
Its easier to remove the 12mm bolt and nut that attach the shock to the motor mount engine bracket than to try and remove the 10mm nut on either the top or bottom.
I'm working on cleaning the engine bay while waiting for the new pressure plate to come in at the Toyota dealers.
Let me know if you would like any particular pictures while I'm working on this. When I hook up the clutch cable, I'll try to get a picture of a neat trick that makes it easier
The motor mounts slip into slots on the sub frame.
Only two nuts need to be removed this way, only one has to come completely out, the other can just be loosed to almost off. I remove the one on the passenger side because it is easier to get to when putting the engine back in. Its difficult to start the nut under the AC compressor.
You can see the studs sticking out of the motor mounts at a 45 degree angle on each side and the nut and washer still attached on one side. When re-installing the engine, you may have to rock the engine a little to get the washer under the slot, but its not hard to do.
This is the passenger side mount bracket, you can see that I just left the washer and nut in it so I wouldn't loose them. When installing, get the drivers side mount in first, then this will just slip in place.
This is the motor mount on the drivers side with the washer and nut still attached. Leave the nut and washer on this side, there is little room to maneuver. You can slip the engine in place with the washer and nut on one side, this is the side to leave on.
Its easier to remove the 12mm bolt and nut that attach the shock to the motor mount engine bracket than to try and remove the 10mm nut on either the top or bottom.
I'm working on cleaning the engine bay while waiting for the new pressure plate to come in at the Toyota dealers.
Let me know if you would like any particular pictures while I'm working on this. When I hook up the clutch cable, I'll try to get a picture of a neat trick that makes it easier
Re: how-to: 4A-C swap
what happened wiht the swap how is it working?
Re: how-to: 4A-C swap
The swap went well as the engines are the same externally. The car had a little more power, but it didn't turn it into a hot rod, just took hills a little better. Unfortunately after about 30k miles, the car got totaled.
Re: how-to: 4A-C swap
do you have pictures of it ? im trying to take out the 3A to put a 4afe but i dont wanna loss the 4wd option so if you can give more details ill apreciate it.
Did you had to cut the firewall?
you just take out the 3a an put the 4a as simply as that
Did you had to cut the firewall?
you just take out the 3a an put the 4a as simply as that
-
Mattel
- Highest Ranking Member
- Posts: 1789
- Joined: Tue Aug 17, 2004 12:11 am
- My tercel:: 1988 Corolla 4wd Wagon (AKA Corolla All-trac) 5speed, AC, Power Sunroof, Windows, Mirrors, Steering, Locking, Diff Lock, 14" Corolla SX Alloys with Silica Hankook Tyres, 4afe, King Springs, Upgraded Headlights, Full Synth oils, 210,000kms
- Location: Melbourne, Australia
Re: how-to: 4A-C swap
Good to hear from you Keith, hope all is good. Neonsport got your old totalled car didn't he?
Previous: 83 Tercel SR5 4wd, 84 Tercel SR5 4wd
88 Corolla 4wd Wagon 5speed, All power options, Fact Sunroof, Diff Lock, 14" SX Alloys, Hankook Tyres, 4afe, King Springs, Upgraded Headlights, Full Synth oils, Tow Bar, 210,000kms
88 Corolla 4wd Wagon 5speed, All power options, Fact Sunroof, Diff Lock, 14" SX Alloys, Hankook Tyres, 4afe, King Springs, Upgraded Headlights, Full Synth oils, Tow Bar, 210,000kms
Re: how-to: 4A-C swap
Mattel, Yes
Pearson, I put in a 4AC, its a straightforward swap. A 4AFE in another animal altogether. It has been done, twice. Look for those posts.
Pearson, I put in a 4AC, its a straightforward swap. A 4AFE in another animal altogether. It has been done, twice. Look for those posts.
Re: how-to: 4A-C swap
New Guy; Does anybody have any info on putting a 22r in a 83 tercel? Is the bell housing the same?
-
Petros
- Highest Ranking Member
- Posts: 11933
- Joined: Sun Jan 28, 2007 6:31 pm
- My tercel:: '84 Tercel4wd w/extensive mods
- Location: Arlington WA USA
Re: how-to: 4A-C swap
The bell housing is not the same at all, that would a major alteration to make it fit. Lots of custom parts, etc., it is a completely different engine platform. Not worth the effort, go with either a 4age or 4afe, much less issues to deal with than a 22r.
'87 Tercel 4wd SR5 (current engine swap project)
'84 Tercel 4wd (daily driver, with on going mods)
'92 Mazda MPV 4wd (wife's daily driver)
'85 Tercel 4wd DLX auto(daughter's daily driver)
'01 Honda Civic (other daughter's daily driver)
'84 Tercel 4wd (daily driver, with on going mods)
'92 Mazda MPV 4wd (wife's daily driver)
'85 Tercel 4wd DLX auto(daughter's daily driver)
'01 Honda Civic (other daughter's daily driver)
Re: how-to: 4A-C swap
I am just gathering the stuff and gaskets ,time belt, ect. Donner eng is out of a Chev Nova I have stripped the intake and exhaust mans
also the water pump is different than the 3a plumbing, did you have to swap waterpumps? Did not realise the oil pan needs to be chg ill compare
when the 3a is out beside on the bench.
Thanks for the info so far.
Bruce
also the water pump is different than the 3a plumbing, did you have to swap waterpumps? Did not realise the oil pan needs to be chg ill compare
when the 3a is out beside on the bench.
Thanks for the info so far.
Bruce