'86 FWD path to daily driver
-
JackWagon
- Advanced Member
- Posts: 65
- Joined: Tue Mar 31, 2015 10:48 am
- My tercel:: 1986 Toyota Tercel Wagon FWD
'86 FWD path to daily driver
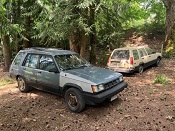
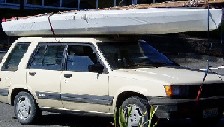
I had been looking for a 3rd gen 4Runner for months without much luck when I came across a '86 wagon with only 90k. Same owner for 25 years, second owner was their neighbor who parked it under a tree for about 4 years and rarely drove it. Filthy and a street parking sideswipe to clean up. Clear coat is trashed, interior funky smell, all sorts of nasty in the engine compartment - can't stand that! I have a short commute on city streets so I'm not bothered by not having 4wd. Most of my projects are pretty tame but reading earlier threads have been helpful just getting familiar with the vehicle. Previous projects have been a 1968 Toyota Stout that I sold last year and I have a '79 MG Midget as a summer driver. Still shopping for a 4Runner as a ski car but happy with my distraction. Here are a couple before shots
You do not have the required permissions to view the files attached to this post.
-
dlb
- Highest Ranking Member
- Posts: 7315
- Joined: Mon Jul 06, 2009 9:03 pm
- My tercel:: '87 sr5, '83 dlx parts car
- Location: bc, canada
Re: '86 FWD path to daily driver
the 4wd wagon i just sold averaged 34 mpg over several months of winter driving so i imagine a 2wd in good working order should be able to get close to 40 mpg in summer. plus the rear seats fold flat, whereas the 4wd do not. so each have their perks, for sure.
-
Petros
- Highest Ranking Member
- Posts: 11933
- Joined: Sun Jan 28, 2007 6:31 pm
- My tercel:: '84 Tercel4wd w/extensive mods
- Location: Arlington WA USA
Re: '86 FWD path to daily driver
Not bad, just needs a good cleaning. You can make the clear coat look better by carefully scrapping off the flakey stuff with a plastic scraper, wet sand the edges with 800 or 1000 grit and give is several coats of clear over it. Not perfect but greatly improves the looks without too much effort.
where are you located? those look like older Washington state plates.
where are you located? those look like older Washington state plates.
'87 Tercel 4wd SR5 (current engine swap project)
'84 Tercel 4wd (daily driver, with on going mods)
'92 Mazda MPV 4wd (wife's daily driver)
'85 Tercel 4wd DLX auto(daughter's daily driver)
'01 Honda Civic (other daughter's daily driver)
'84 Tercel 4wd (daily driver, with on going mods)
'92 Mazda MPV 4wd (wife's daily driver)
'85 Tercel 4wd DLX auto(daughter's daily driver)
'01 Honda Civic (other daughter's daily driver)
-
JackWagon
- Advanced Member
- Posts: 65
- Joined: Tue Mar 31, 2015 10:48 am
- My tercel:: 1986 Toyota Tercel Wagon FWD
Re: '86 FWD path to daily driver
I'm south of Seattle in Tacoma
For the clear coat, I will be using Eastwoods clear after I use up the rest of my Griots polish. I used their series on my MG and it saved me a new paint job. I've tried it in a couple of areas on the hood and there doesn't seem to be much damage yet to the color. The roof though - I might clean it up and wrap it with solid white 3M. Might be a fun experiment. If it looks silly I can always peel it off.
For the clear coat, I will be using Eastwoods clear after I use up the rest of my Griots polish. I used their series on my MG and it saved me a new paint job. I've tried it in a couple of areas on the hood and there doesn't seem to be much damage yet to the color. The roof though - I might clean it up and wrap it with solid white 3M. Might be a fun experiment. If it looks silly I can always peel it off.
Last edited by JackWagon on Sun May 03, 2015 10:11 am, edited 1 time in total.
-
JackWagon
- Advanced Member
- Posts: 65
- Joined: Tue Mar 31, 2015 10:48 am
- My tercel:: 1986 Toyota Tercel Wagon FWD
Re: '86 FWD path to daily driver
I've had the bumpers off for 2 weeks working on removing all of the bumper stickers. Once I finished carefully peeling & scraping, I wet sanded one grade every evening (220, 400 etc) Now that it's time to paint, I can't catch a break with the weather: too cold, too rainy, etc. Wish I had a bigger garage.
Anyway I thought I'd share that my first attempt at painting with SEM Flexible Bumper paint was really disappointing. It just brought forward each and every scratch/cut mark. I really should go buy the automix filler but most of the scratches are not very deep - but there are a lot of them. I thought I'd try using their flex primer as a base coat first. New paint was sanded off.
Yesterday they got 3 light coats of primer and I think the results now will be much better. (I used the entire can.) It had just enough solids to fill the scratches. Unfortunately, I'm out of bumper paint and waiting on my Amazon delivery. Another sad discovery: my local O'Reily's can get SEM products same day and about $3 cheaper than Amazon. Baxters was the same price as Amazon
-
Petros
- Highest Ranking Member
- Posts: 11933
- Joined: Sun Jan 28, 2007 6:31 pm
- My tercel:: '84 Tercel4wd w/extensive mods
- Location: Arlington WA USA
Re: '86 FWD path to daily driver
I bought a two part rubber repair compound that worked on the Tercel bumper, from Autozone. Is that the same suff you are talking about. I have not tried it on scratches, but I had several tears that I used to glue and fill it, after it cures you can sand it smooth. I also used it on a corolla bumper, and painted it to match the car. work well in both instances.
'87 Tercel 4wd SR5 (current engine swap project)
'84 Tercel 4wd (daily driver, with on going mods)
'92 Mazda MPV 4wd (wife's daily driver)
'85 Tercel 4wd DLX auto(daughter's daily driver)
'01 Honda Civic (other daughter's daily driver)
'84 Tercel 4wd (daily driver, with on going mods)
'92 Mazda MPV 4wd (wife's daily driver)
'85 Tercel 4wd DLX auto(daughter's daily driver)
'01 Honda Civic (other daughter's daily driver)
-
JackWagon
- Advanced Member
- Posts: 65
- Joined: Tue Mar 31, 2015 10:48 am
- My tercel:: 1986 Toyota Tercel Wagon FWD
Re: '86 FWD path to daily driver
While I'm waiting for my paint to arrive and the bumpers are off, I've been cleaning. Headlamp assembly was removed and repainted along with the grill & headlamp bezel. The battery box was in sad shape. The 3 bolts at the bottom were rusted out and difficult to remove. I soaked them then hammered an 8mm socket onto the bolt head, finally got the grip needed to remove them. The replacements are stainless and so are the washers plus a dab of anti seize. I also replaced the 4 screws holding the headlight frame with stainless bolts too. Hardware store bill $ 3.50
You do not have the required permissions to view the files attached to this post.
-
JackWagon
- Advanced Member
- Posts: 65
- Joined: Tue Mar 31, 2015 10:48 am
- My tercel:: 1986 Toyota Tercel Wagon FWD
Re: '86 FWD path to daily driver
Finally finished painting the bumpers and time to put them back on the car. The rear reinstalled without issue but I knew getting the front back on would require some wiring corrections. Turns out that the PO was having trouble with the right front turn signal and the repair shop was putting in a replacement bulb at every oil change for $10. When I removed the front bumper, the signal wiring was pinched and broke off completely
I thought I'd share one of YouTube video I used to learn to solder. The Eric the Car guy video shows a handmade solution to hold the wires: a coiled length of copper wire and alligator clips. I used this technique repairing the wiring harness on my MG and the joints are strong and protected by heat shrink tubing. Although if I have the parts on my bench, I have a small vise fitted with a magnifying glass that makes it easier to hold the assembly.
http://youtu.be/L61LJcz7H6g
Also in the video at the 16 min mark, he shows how to remove the wires from the OEM connectors without damage. Instead of a pick, I have a set of tiny screw drivers from Harbor Freight that can reach the tiny tab he references.
You do not have the required permissions to view the files attached to this post.
Last edited by JackWagon on Sun May 24, 2015 10:16 am, edited 1 time in total.
-
JackWagon
- Advanced Member
- Posts: 65
- Joined: Tue Mar 31, 2015 10:48 am
- My tercel:: 1986 Toyota Tercel Wagon FWD
Re: '86 FWD path to daily driver
The cargo area was completely removed this past weekend and scrubbed then scrubbed again. I also found the bolts for the rear passenger window trim.
There are two 8mm nuts at the top and one fastener that can be carefully pryed out from the exterior. The nuts are accessible after removing the interior panel. I happen to catch a glimpse of sunlight through the 2 access holes after removal that I thought was funny.
The gaps behind my trim was packed solid with pollen, pine needles, even small rocks.
The trim had cracked a couple of places so I used JBweld plastic putty to reseat the bolts.
You do not have the required permissions to view the files attached to this post.
Last edited by JackWagon on Wed May 20, 2015 4:03 pm, edited 1 time in total.
-
JackWagon
- Advanced Member
- Posts: 65
- Joined: Tue Mar 31, 2015 10:48 am
- My tercel:: 1986 Toyota Tercel Wagon FWD
Re: '86 FWD path to daily driver
Rear bumper before/after. I ended up using SEM flexible bumper paint and primer. Trim around the license plate is on the list to paint
You do not have the required permissions to view the files attached to this post.
-
JackWagon
- Advanced Member
- Posts: 65
- Joined: Tue Mar 31, 2015 10:48 am
- My tercel:: 1986 Toyota Tercel Wagon FWD
Re: '86 FWD path to daily driver
The interior side panels are/were a cream/tan color in my wagon. They were especially stained and faded around the windows. I used SEM products to repaint: Scuff & Clean, Plastic Prep, Sand Free then Silver ColorCoat.
Here is a link to the instructions I've been following
http://www.semproducts.com/manage/html/ ... Manual.pdf
I wanted the color to match the seats and silver is a little too light. I might go one shade darker since it was an easy project.
Edit: for the front pillar trim on either side of the windshield, I tried warm gray. I think it complements the dash a little better. I'm going to use the rest of the silver for smaller trim like the "Toyota" in the cargo window
You do not have the required permissions to view the files attached to this post.
Last edited by JackWagon on Mon Jun 01, 2015 8:45 pm, edited 6 times in total.
-
JackWagon
- Advanced Member
- Posts: 65
- Joined: Tue Mar 31, 2015 10:48 am
- My tercel:: 1986 Toyota Tercel Wagon FWD
Re: '86 FWD path to daily driver
Plastic grommets seal the washer pumps into the jar (that holds the washer fluid). Besides needing access to clean out that corner of the engine bay, cleaning out the coolant overflow jar was an unintentional bonus. Real surprise to see the lumps and gunk come out. Very gross. Also discovered that one of ports was leaking. I made a temporary fix but a NOS part is needed. In the picture, the original part is on the right - I was able to use the $1.50 seal to temporarily repair the tear and stop the slow drip
You do not have the required permissions to view the files attached to this post.
-
JackWagon
- Advanced Member
- Posts: 65
- Joined: Tue Mar 31, 2015 10:48 am
- My tercel:: 1986 Toyota Tercel Wagon FWD
Re: '86 FWD path to daily driver
The wiper jar is holding with the temp fix. Today was spent mostly putting the front bumper on which was not easy. I had trouble with the rubber gaskets.
Once I got the bumper secured and checked the turn signals, left was fine but when I tried the right signal it was clicking double time. This can be a sign that a bulb is out so I swapped them as a test. Bulb was good. I was just about to break everything apart again convinced one of the solder joints broke apart.
At the last minute, I decided to first test the harness up to the junction of the pigtail with an extra turn signal socket. No trouble there. Simple answer: Turns out all that was needed was a little more care to be sure the prongs were lined up.
I have a working fuel gauge, turn signals, and all 4 hubcaps (mail man brought the long lost ebay purchase). Now it's time to start putting the interior back together
You do not have the required permissions to view the files attached to this post.
-
JackWagon
- Advanced Member
- Posts: 65
- Joined: Tue Mar 31, 2015 10:48 am
- My tercel:: 1986 Toyota Tercel Wagon FWD
Re: '86 FWD path to daily driver
Weather took another dive and once again it's too cold to paint. Time to tackle the front cowl and to do that, wiper arms have to come off. I've actually been working on getting them off for weeks but now that I bought a puller, they surrendered. Everytime I thought about it, I'd spray more lube on so maybe that helped.
I marked with tape the arm position, flipped up the tab to expose the nut and removed it, then pivoted the arm up perpendicular to the windshield and with a good tug the dumb things finally came off. All 3 were very rusty and I spent at least 20 min on each at the grinder (with wire wheel attached)
I want to keep the side saddle but very soon I'm going to need 6 stainless screws. (Local hardware stores didn't have a replacement - the threads on mine were too narrow. I found an option on eBay, I'll post an update when they arrive. I'm skeptical). Update: these screws were a perfect fit! I drove all over and found close matches that were bound to strip. These are the correct depth and thread
You do not have the required permissions to view the files attached to this post.
Last edited by JackWagon on Mon Jun 01, 2015 8:50 pm, edited 3 times in total.
-
JackWagon
- Advanced Member
- Posts: 65
- Joined: Tue Mar 31, 2015 10:48 am
- My tercel:: 1986 Toyota Tercel Wagon FWD
Re: '86 FWD path to daily driver
With the wiper arms off, the cowl is next. I was relieved to read that the hood does not have to be removed. There are a couple screws on the lip and two plastic fasteners to pry up at either end. All were easy to remove and the cowl slides out. There is a rubber gasket that runs the length, with years of caked pollen and dirt, mine was cemented in place. I poured warm water on it and slowly pryed it up. I didn't want it to tear. Lots of leaves and yuck - but thankful not to find a mouse
You do not have the required permissions to view the files attached to this post.