i took took the top off of my weber today to check the float level and found it to be quite different from the weber float guide i was following. here is the guide:
http://mcelroymotorsport.co.uk/Document ... 0guide.pdf
according to the guide, the float level should be checked while holding the carb top vertical with the float pivot at the top. it also says the float should be resting against but not compressing the spring-loaded ball in the needle valve. this is not consistent with the diagram though, which shows the float level with the carb top--this indicates that the spring-loaded ball is compressed, not simply resting against the ball. the measurement it indicates for this position is 35 mm. it also shows the float at rest, measured at 51 mm.
when i checked mine, i found it made the most sense to measure the float at three positions: at complete rest, resting against but not compressing the spring-loaded ball, and compressing the spring-loaded ball. my measurements were
45 mm at complete rest
41 mm while resting against but not compressing the spring-loaded ball
36 mm while compressing the spring-loaded ball
when i googled these results, they seemed to be consistent with the float levels of numerous other individuals running the 32/36 DGEV. if anyone has any other results, please post them so that we can compare.
i will be replacing my float and needle valve and seat in the near future so i will take pics of the process when i do it. i put off doing this job because i wasn't exactly sure where to start and couldn't find any guides online so i will make one myself. it only took 10 minutes to remove everything, very easy.
*edit* the link above seems to be dead so here is the same diagram i was referencing:
http://www.minimania.com/images/article ... at_DGV.gif
weber float level clarification
-
dlb

- Highest Ranking Member
- Posts: 7330
- Joined: Mon Jul 06, 2009 9:03 pm
- My tercel:: '87 sr5, '83 dlx parts car
- Location: bc, canada
weber float level clarification
Last edited by dlb on Thu May 24, 2012 3:46 pm, edited 1 time in total.
-
dlb
- Highest Ranking Member
- Posts: 7330
- Joined: Mon Jul 06, 2009 9:03 pm
- My tercel:: '87 sr5, '83 dlx parts car
- Location: bc, canada
Re: weber float level clarification
after further reading, it looks like the 45 mm at complete rest setting is only for "aggressive off-roading" (as noted here in the float setting notes: http://www.redlineweber.com/html/Tech/3 ... akdown.htm). up until a few days ago, i had never opened my weber before so i don't know why it came set up for aggressive off-roading when i bought it new but i will adjust it to the recommended stock setting of 51 mm at complete rest and see what happens.
-
Lil Beast
- Top Notch Member
- Posts: 308
- Joined: Mon Oct 03, 2011 9:25 pm
- My tercel:: 81 tercel sr5 GTS (4age RWD and 4WD application on build up for the moment) now im running a 3a with weber 32 dmsa 100,corolla gts front suspension, sway bar and steering, troush exhaust
- Location: Oliver B.C. Canada
Re: weber float level clarification
For off-road they set the float lower so the carb don't overflow in rough uneven terrain! It does not change the performance!
Dont let your eyes to fool you!!!
Labine R.
Labine R.
-
dlb
- Highest Ranking Member
- Posts: 7330
- Joined: Mon Jul 06, 2009 9:03 pm
- My tercel:: '87 sr5, '83 dlx parts car
- Location: bc, canada
Re: weber float level clarification
i think you have it backwards, LB. because the float measurement is from the bottom of the carb top plate to the bottom of the float, the LOWER measurement of 45 mm means the float sits 6 mm HIGHER at complete rest than the stock setting of 51 mm. i assume that's because it will help keep the carb from being fuel starved while the gas rolls around in the bowl due to the vehicle driving on steep hills front to back and side to side.
-
dlb
- Highest Ranking Member
- Posts: 7330
- Joined: Mon Jul 06, 2009 9:03 pm
- My tercel:: '87 sr5, '83 dlx parts car
- Location: bc, canada
Re: weber float level clarification
here we go, pictorial on how to check and/or replace the float and/or needle valve and seat in your weber 32/36 dgev. a disclaimer: probably a good idea not to smoke, hammer stuff and make sparks, or zap anyone with static electricity while messing around with gas, duh.
unplug the electric choke and tuck it out of the way so it doesn't ground out on anything.
disconnect the fuel hose and position it facing upwards so gas doesn't leak all over the place.
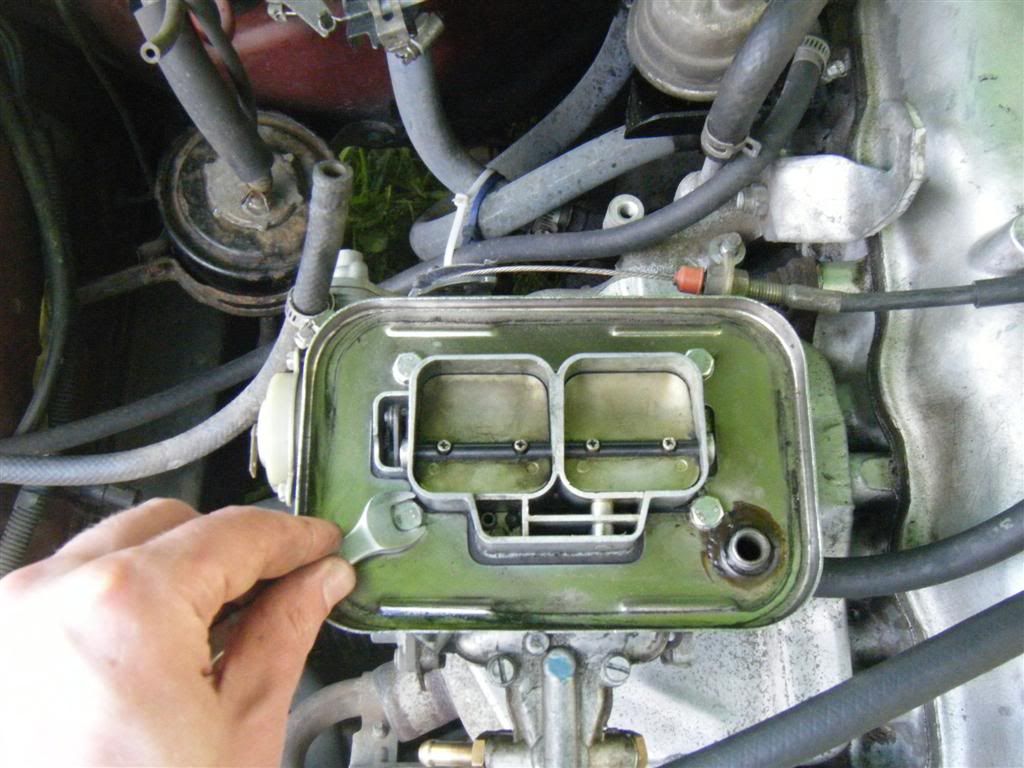
pull off the clips and remove the air filter and lid.
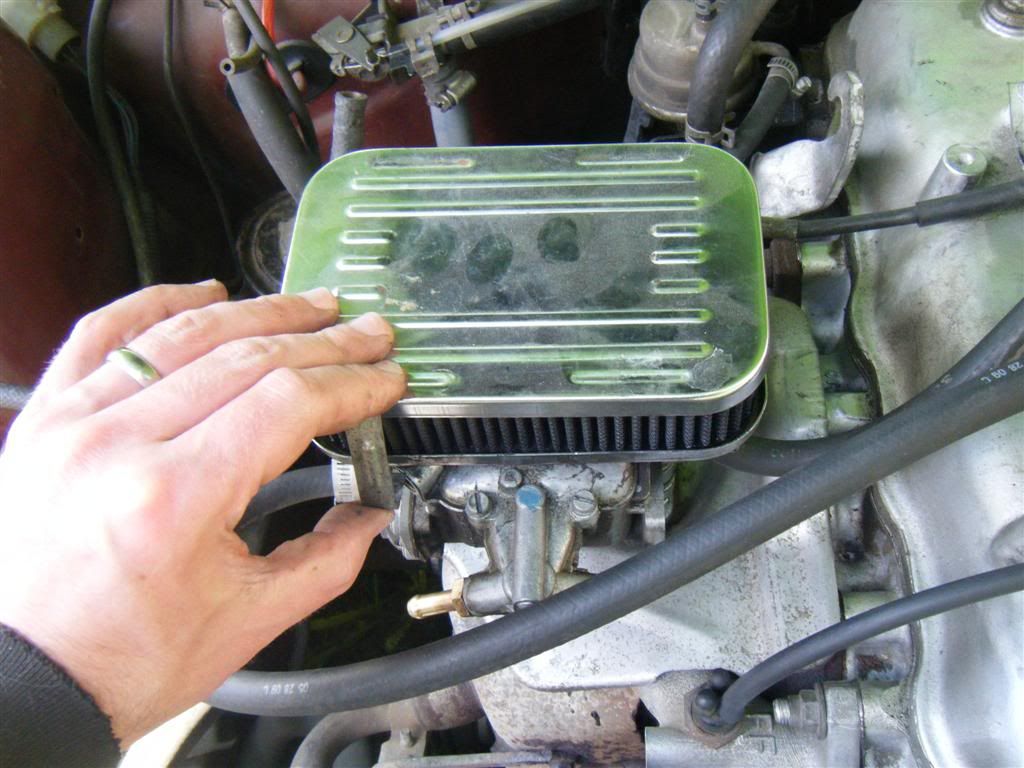
undo the four 10 mm bolts that hold the bottom of the air filter housing to the carb. carefully remove the gasket underneath it.
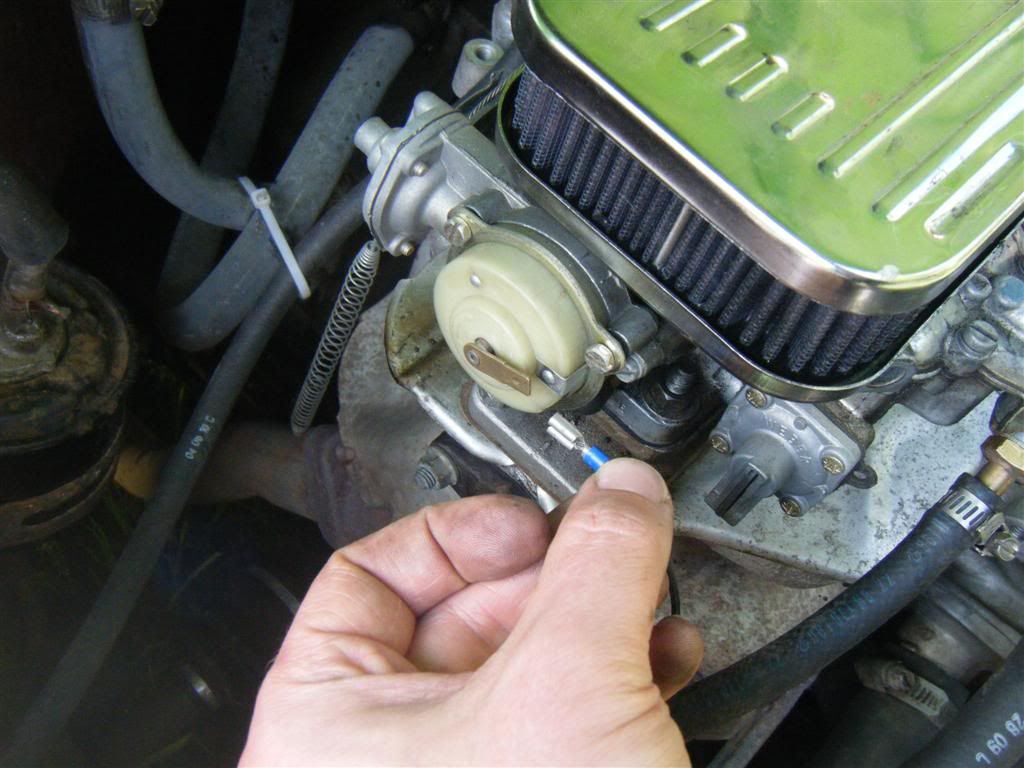
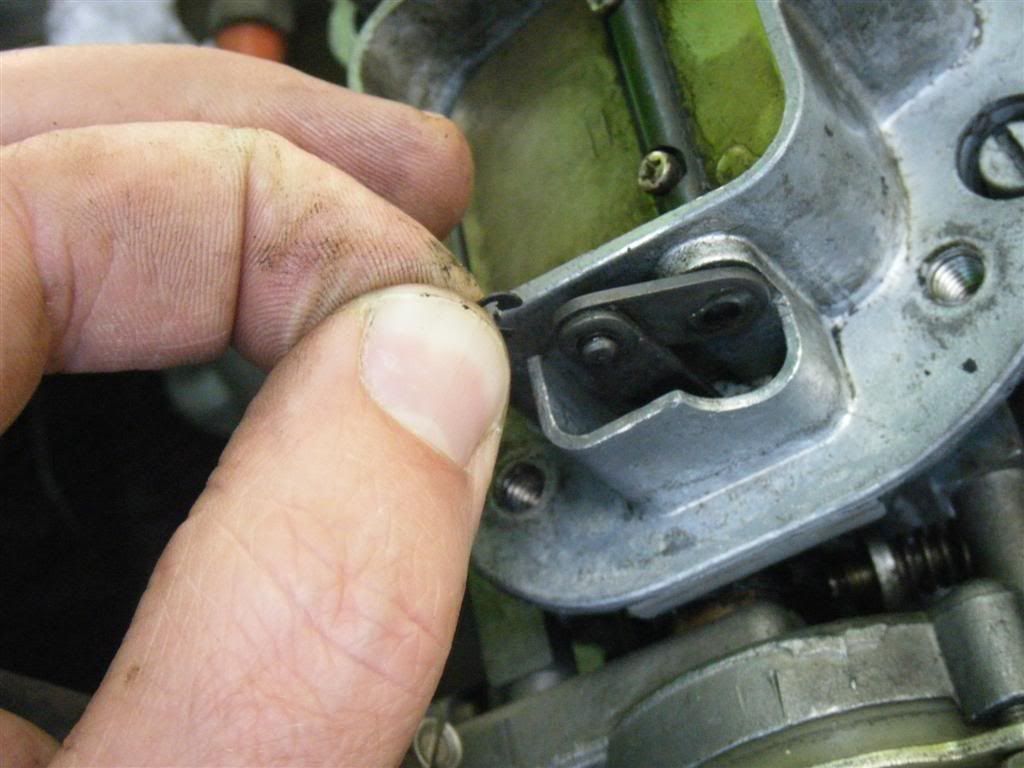
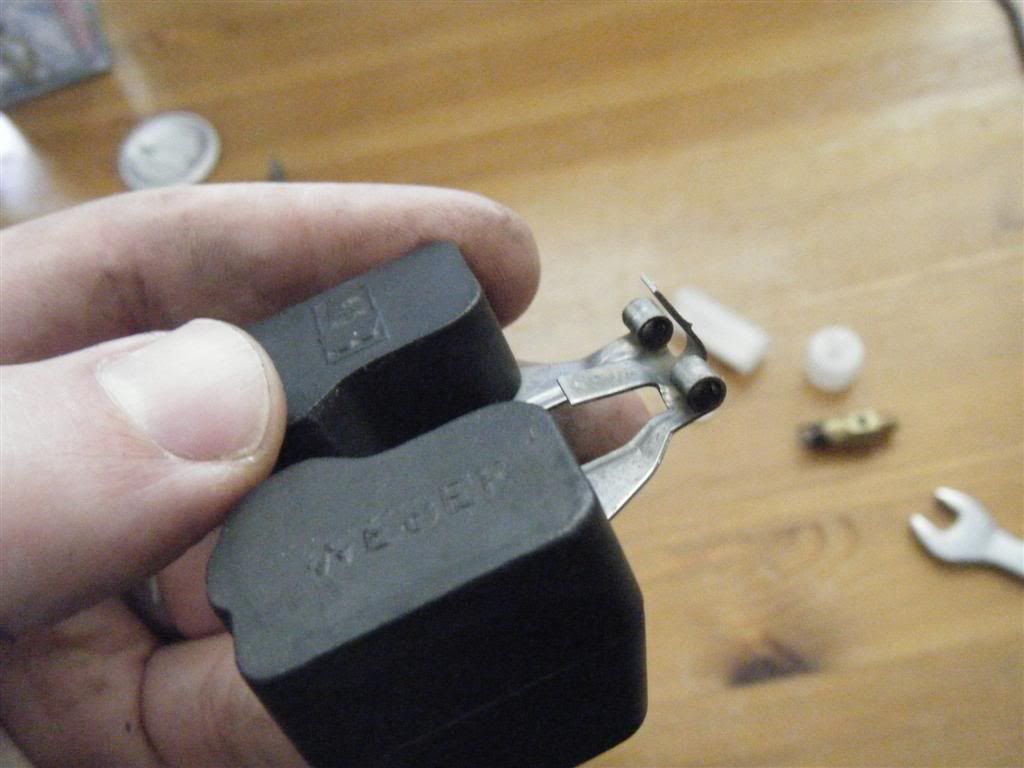
carefully--VERY carefully--remove this tiny little circlip that holds the choke linkage and choke valve together. put your fingers on it and then push it off with a flat screwdriver.
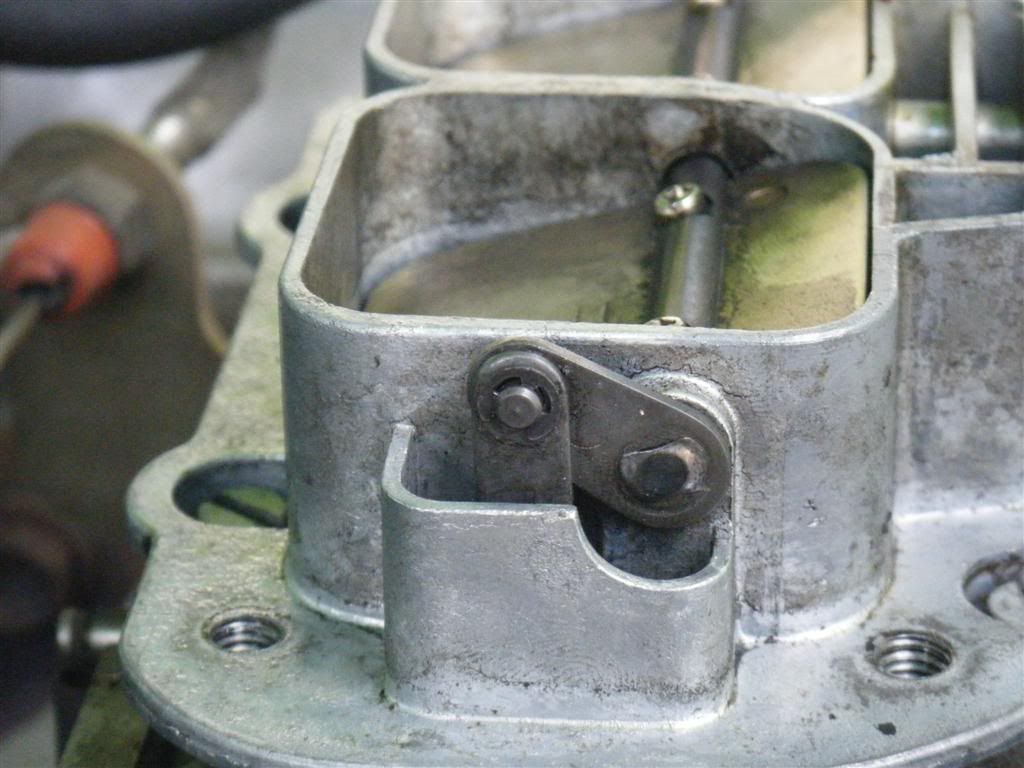
he's a tiny little fella.
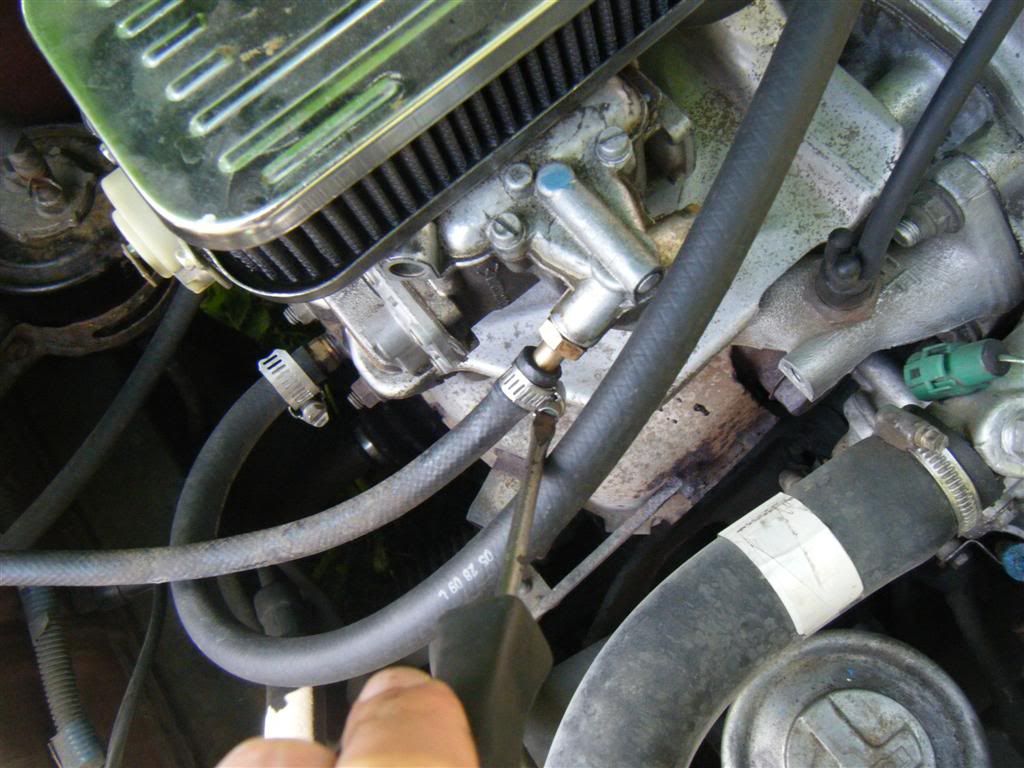
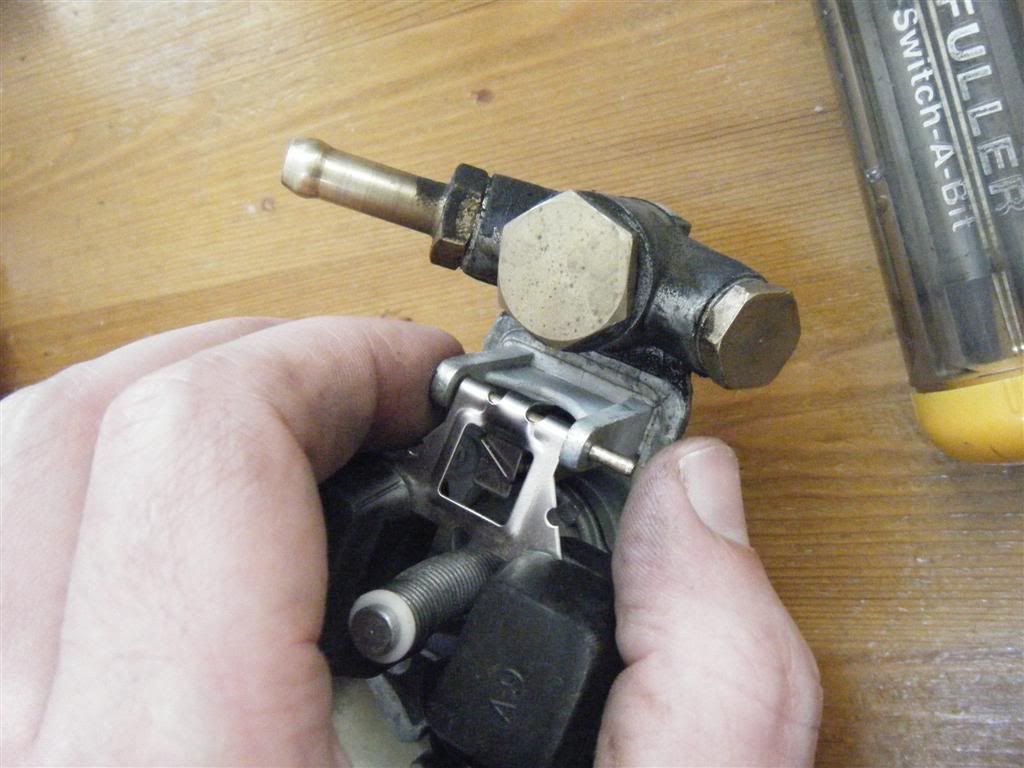
undo the 6 flat blade screws that hold the carb top to the body. i'm pointing at a few of them here.
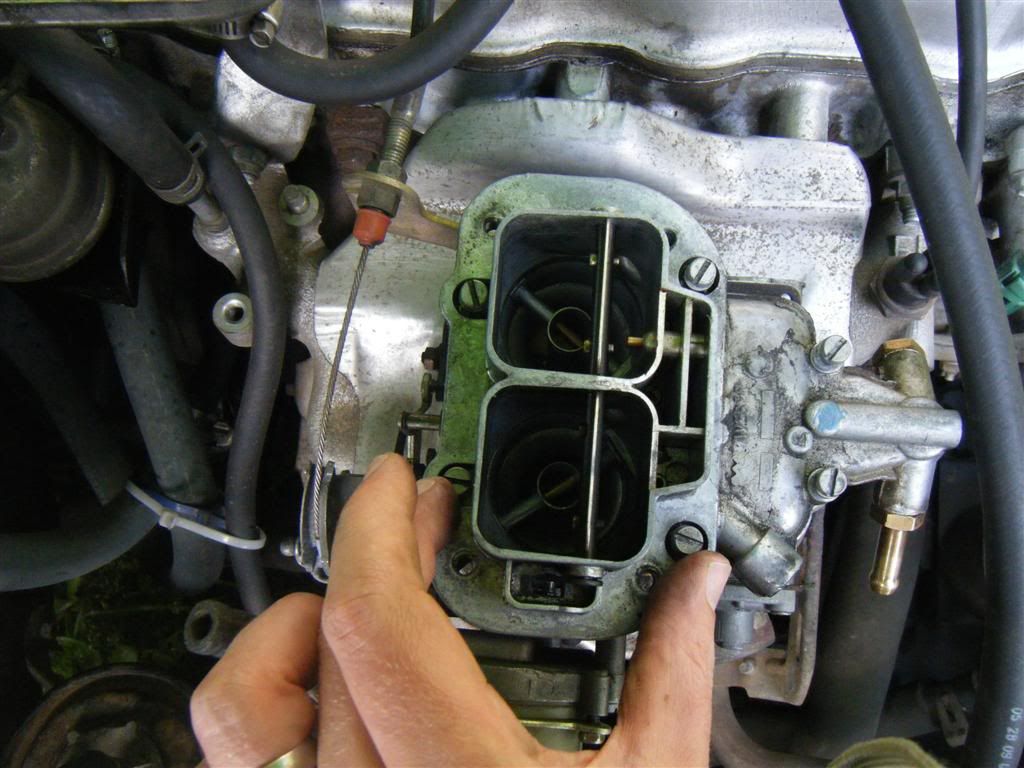
now carefully remove the carb top. don't tear the gasket between it and the carb body.
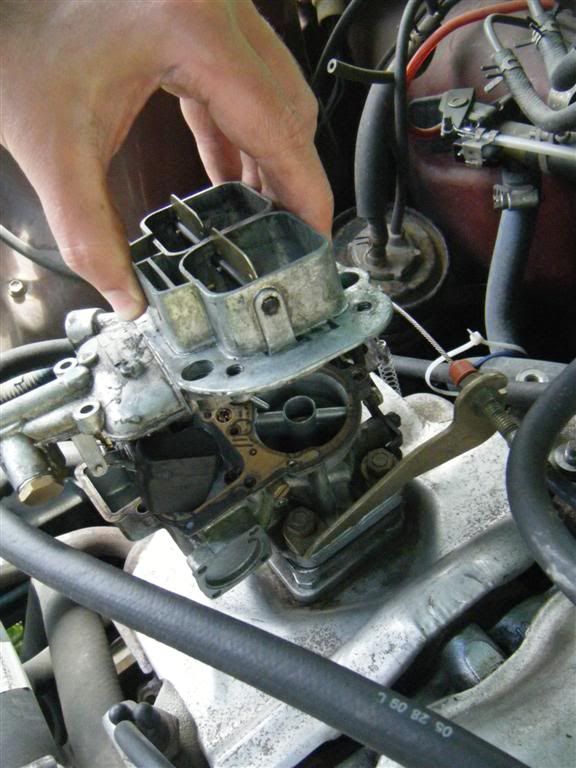
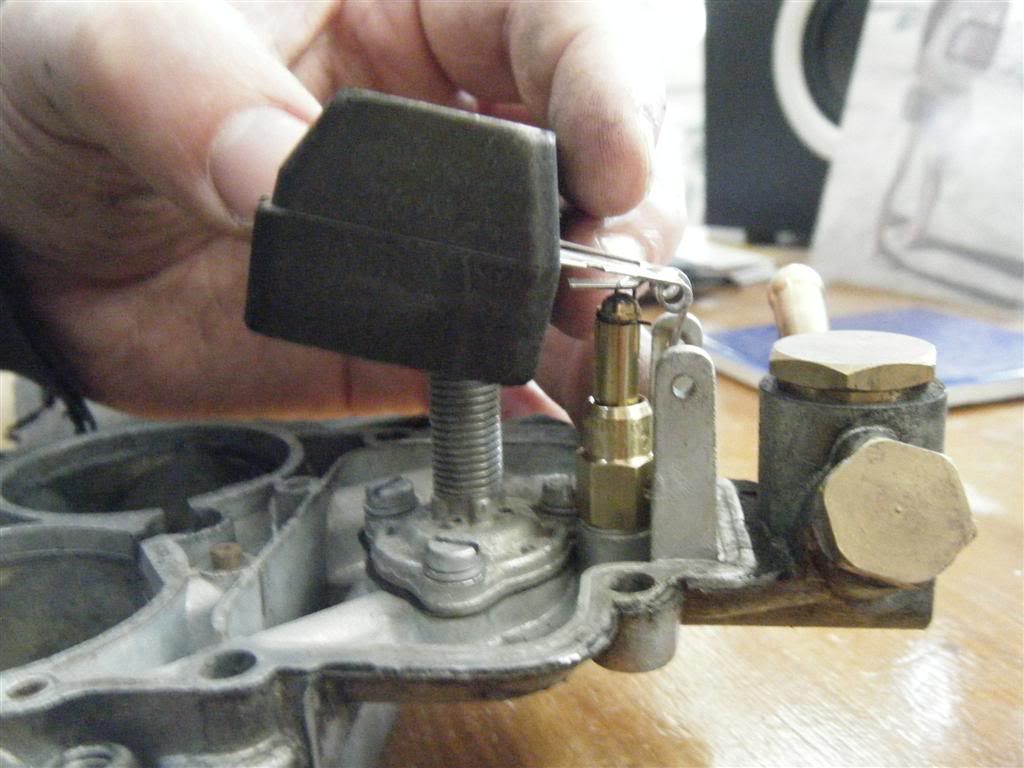
take the carb top somewhere clean and carefully remove the gasket from it. measure the float level as shown in this diagram:
http://www.minimania.com/images/article ... at_DGV.gif
if you need to remove the float to adjust the level, slide the pin out...
and lift the float and needle valve out.
carefully bend the upper metal arm to adjust the complete resting position of the float, and the lower metal arm to adjust the resting against the spring-loaded ball/compressing the spring-loaded ball position.
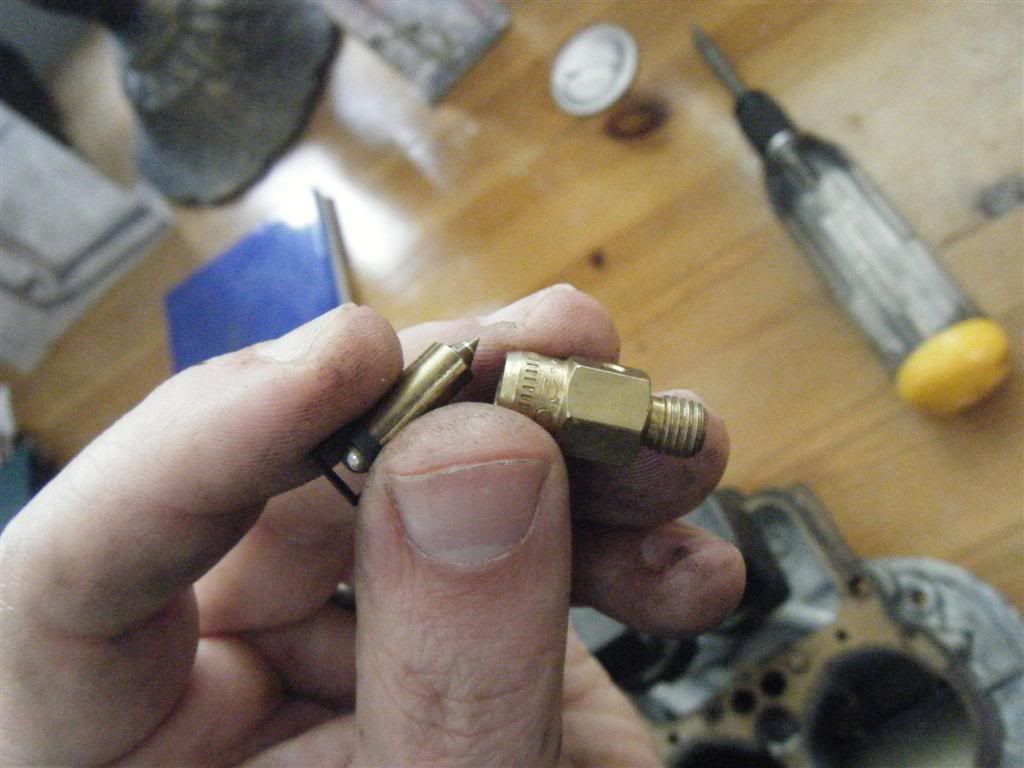
the needle valve just lifts in and out of its seat. to remove the seat, use a tiny 10 mm wrench on it.
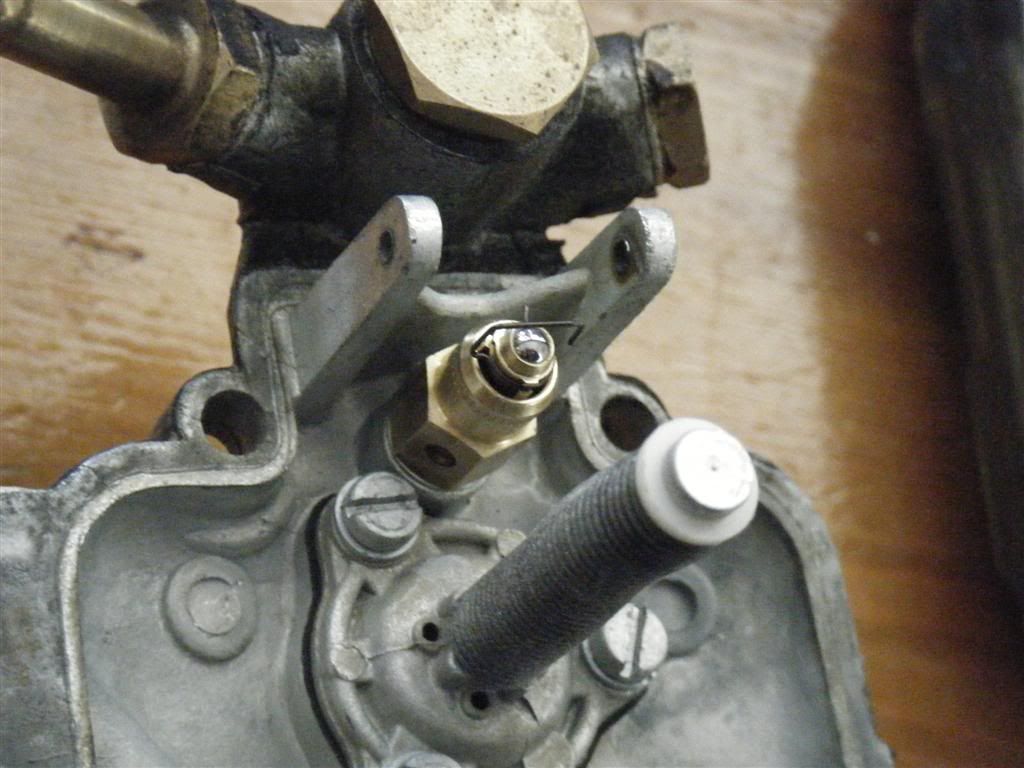
here is the needle valve and seat removed. the pointy part should be smooth with no scores, rough spots, or dirt. if there is it will not seal and gas will constantly leak into the float bowl, raising the fuel level and causing the carb to run rich.
installation is the same steps in reverse. easy!
unplug the electric choke and tuck it out of the way so it doesn't ground out on anything.
disconnect the fuel hose and position it facing upwards so gas doesn't leak all over the place.
pull off the clips and remove the air filter and lid.
undo the four 10 mm bolts that hold the bottom of the air filter housing to the carb. carefully remove the gasket underneath it.
carefully--VERY carefully--remove this tiny little circlip that holds the choke linkage and choke valve together. put your fingers on it and then push it off with a flat screwdriver.
he's a tiny little fella.
undo the 6 flat blade screws that hold the carb top to the body. i'm pointing at a few of them here.
now carefully remove the carb top. don't tear the gasket between it and the carb body.
take the carb top somewhere clean and carefully remove the gasket from it. measure the float level as shown in this diagram:
http://www.minimania.com/images/article ... at_DGV.gif
if you need to remove the float to adjust the level, slide the pin out...
and lift the float and needle valve out.
carefully bend the upper metal arm to adjust the complete resting position of the float, and the lower metal arm to adjust the resting against the spring-loaded ball/compressing the spring-loaded ball position.
the needle valve just lifts in and out of its seat. to remove the seat, use a tiny 10 mm wrench on it.
here is the needle valve and seat removed. the pointy part should be smooth with no scores, rough spots, or dirt. if there is it will not seal and gas will constantly leak into the float bowl, raising the fuel level and causing the carb to run rich.
installation is the same steps in reverse. easy!
-
GLet71

- Highest Ranking Member
- Posts: 608
- Joined: Mon Feb 20, 2012 11:09 pm
- My tercel:: '87 6-spd SR5 4wd Wagon
- Location: Nelson, BC Canada
Re: weber float level clarification
Well done David! Now if you could just do the same with an Aisan carb I would be rockin'! Or perhaps this is the incentive to upgrade?
Currently:
Majorette France Tercel 4WD - Fini
Formerly:
'87 6spd SR5 4WD modified Wagon (Ron, the post-apocalyptic summer ride)
'87 6spd dlx 4wd Wagon (Pinkman Got Nuthin', aka Pinky)
'87 Auto dlx 4WD Wagon (Otto, temporary parts car)
'88 6spd SR5 4WD Wagon (Perry, the parts car)
Majorette France Tercel 4WD - Fini
Formerly:
'87 6spd SR5 4WD modified Wagon (Ron, the post-apocalyptic summer ride)
'87 6spd dlx 4wd Wagon (Pinkman Got Nuthin', aka Pinky)
'87 Auto dlx 4WD Wagon (Otto, temporary parts car)
'88 6spd SR5 4WD Wagon (Perry, the parts car)
-
ARCHINSTL

- Goldie Forever
- Posts: 6369
- Joined: Sat Apr 30, 2005 1:52 pm
- My tercel:: Goldie is a 1986 SR5 attualmente con Weber/also owned the first T4WD in STL in late '82
- Location: Kirkwood, a 'burb of St. Louis
Re: weber float level clarification
WOW, yet again! Well done!
This is now a sticky and moved to Repair Guides.
While not having done it, about the only thing I could add is on that tiny circlip in photos 5 and 6...perhaps stuff a piece of cloth in the carb barrels and the same in the choke lever "chamber." And get a big piece of carbboard and lay it under the engine.
Thanks!
Tom M.
T4WD augury?
"Oh, do not ask, 'What is it?' Let us go and make our visit."
T.S. Eliot - "The Love Song of J. Alfred Prufrock"
"Now and then we had a hope that, if we lived and were good, God would permit us to be pirates."
Mark Twain
"Oh, do not ask, 'What is it?' Let us go and make our visit."
T.S. Eliot - "The Love Song of J. Alfred Prufrock"
"Now and then we had a hope that, if we lived and were good, God would permit us to be pirates."
Mark Twain